

SnakeMaster Complete Guide — Controls, Life and Overheat, 20 Foods, 20 Troublemakers and 5 Items Explained

Follow the eyes,
free them one by one
A square board, and colorful snakes lying tangled all over it. Tap one and it shoots off the way its own eyes are looking. If the way ahead is clear it slides right off the board; if another snake or a troublemaker is in the way, it bumps, loses some life and slides back to where it started. Which snake do you pull out first so the next one’s path opens up? Reading that order is the whole SnakeMaster guide in one sentence.

This is the complete SnakeMaster guide and the first post that explains how to play from start to finish. How a round flows, what your finger actually does, the screen layout, bumps and life, time and overheat, score and stars, the twenty foods and twenty troublemakers, the five items, the bonus board every 10 levels, the twenty-two worlds, the bottom bar and continuing after a loss — everything in the game, in order. The numbers are values checked in the game’s code, and the photos and moving pictures were captured from the real game (an automatic player did the tapping, not a human hand). If you’re new, you can jump straight to Six things for first-timers at the bottom.
- The rule of a round — empty the board to clear it
- The screen — where to look
- Controls — one tap, the eyes are the arrow
- Bumps and life 100
- Time and overheat — time is life
- Score · combos · stars
- Twenty foods and H Coins
- Troublemakers 1 — the ten that pop up and sink
- Troublemakers 2 — the ten that move, and the hunters
- The five items
- The bonus board — every 10 levels
- Levels and difficulty · the twenty-two worlds
- The bottom bar — shop · missions · achievements · settings
- Clear · Game Over · Continue
- Six things for first-timers
The rule of a round — empty the board to clear it
The rule fits in one sentence. Send every snake off the board and you clear the level; lose all 100 life and it’s game over. You never lose just because a timer ran out. Run past the set time, though, and the board “overheats” and your life starts draining a little at a time (Chapter 5).
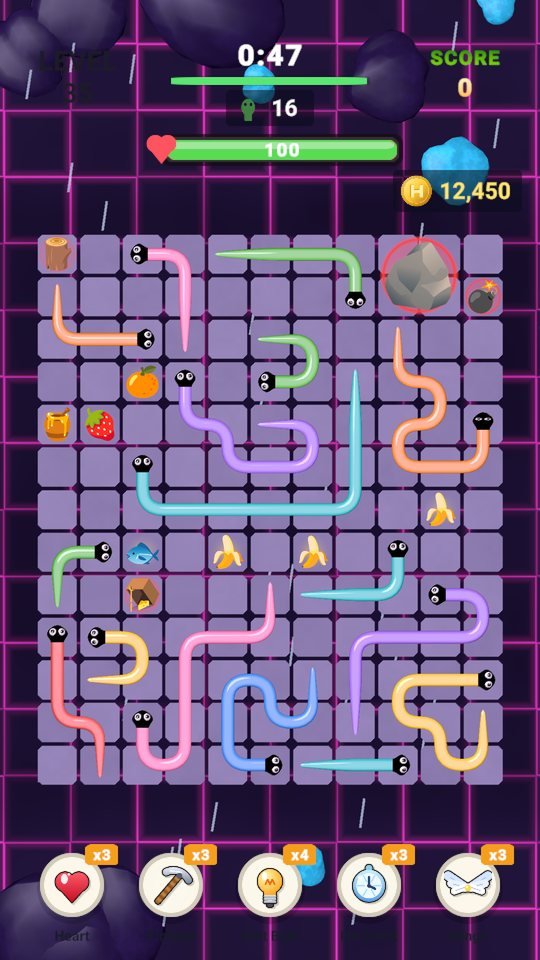
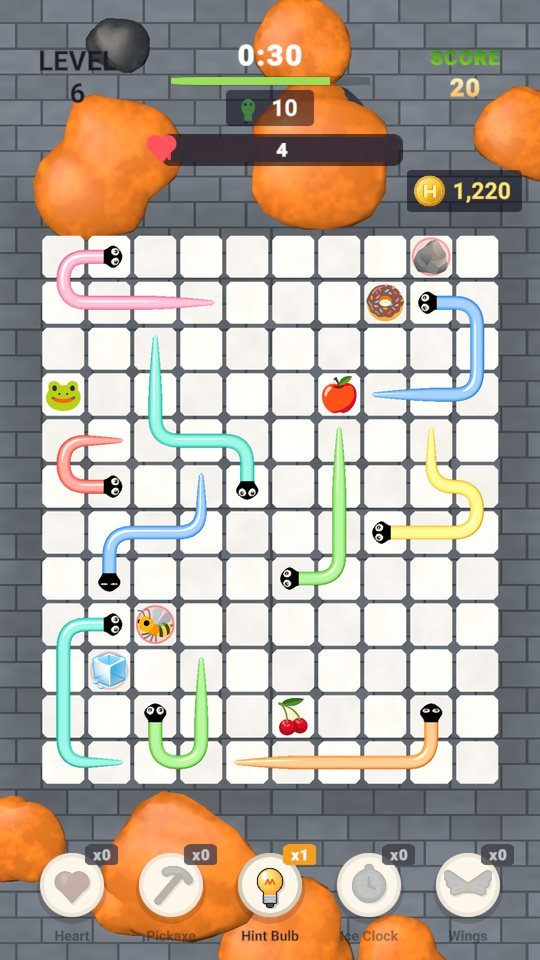
 A real level 2 — ten snakes, one rock, three foods
When the last snake leaves the board, you’re done. A ring of light spreads, then the Perfect! banner (cleared with no bumps and no hint) or the Untangled! banner, three star slots and two seconds of fireworks, and then the result screen appears.
If a bump or overheat takes your life to 0, it’s GAME OVER. If you’re holding a Heart item, it steps in once, automatically, at that moment and brings you back with 40 life.
A board is built by placing snakes one at a time, each in a spot where it can get out. So doing the placements in reverse order is a perfect solution. No matter how tangled it looks, there is always a way out.
How a round flows
- Loading screen — Loading appears, and your nickname unfolds briefly at the top. The nickname is generated automatically on first launch as “color + animal + number” (for example JadeFox4821).
- Home (continue) screen — under the app icon you’ll see LEVEL 1 · SCORE : 0 and a green START button. When you reopen the game, you carry on from your saved level and score.
- Baby snake parade — every time the level changes, instead of a black screen, nine colorful baby snakes wriggle across a meadow, kicking up dust, and the word “LEVEL” with a number pops up in the middle. A new board is being built behind it all.
- 3 · 2 · 1 — it only counts down on a fresh start or when you hit Retry. When you clear a board and move on to the next level, there’s no countdown and play starts right away.
- Go — the snakes settle down from above, and on levels 1–3 the line Tap a snake — it runs straight the way its eyes look appears at the bottom for 5 seconds. The clock starts running.
- The end — if you clear, tap NEXT on the result screen; if it’s game over, choose CONTINUE LEVEL or RETRY (Chapter 14).
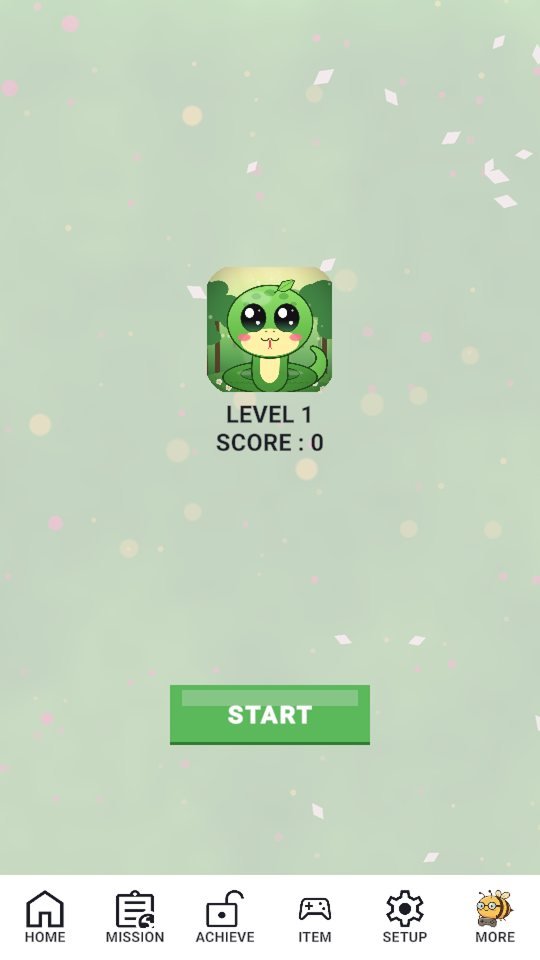
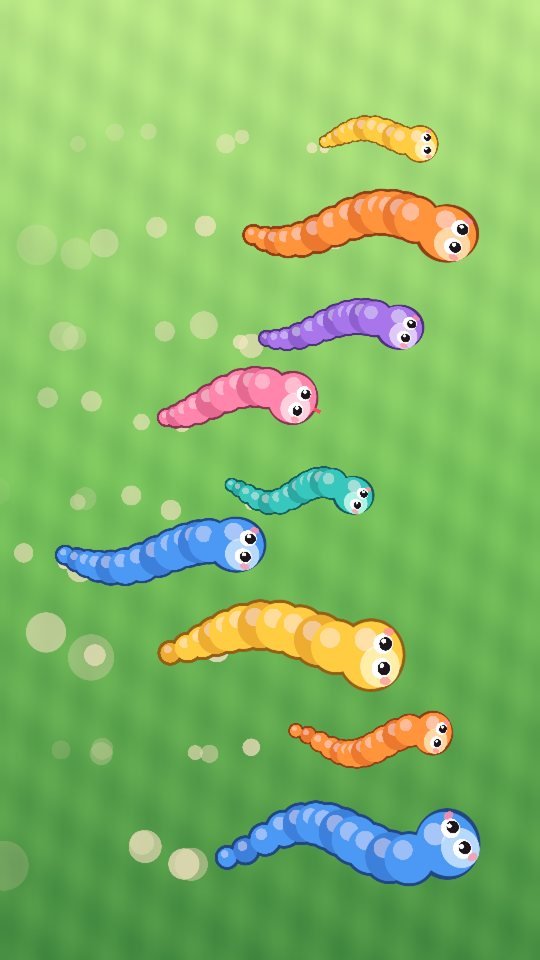

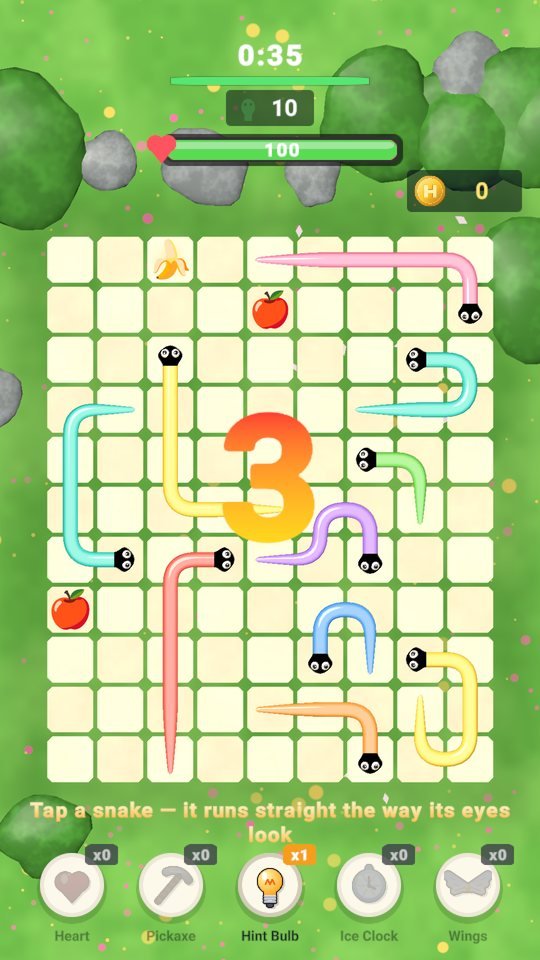

What’s nice is that the countdown doesn’t hide the board. The whole board is already visible during 3 · 2 · 1, so use those two-odd seconds to scan for which snakes can leave right now.
The screen — where to look

- Level — top left, LEVEL N.
- Clock — top center. It counts down this board’s par time. Under 10 seconds the digits turn red and the bar blinks. At 0 the number is replaced by OVERHEAT (Chapter 5).
- Snakes left — below the clock, the number beside the snake icon. It drops by one each time a snake leaves.
- Score — the number under SCORE at the top right. Your running total so far.
- Life — below the snakes-left count: a heart, a bar and a number in the middle. Every board starts at 100.
- H Coins — below the score, on the right: the coins you hold. When a snake leaves or eats a food, gold coins fly over and add to this number.
- The board — the square cells. A golden circle on the board is a food; a red ring is a troublemaker.
- Hint line — when something happens for the first time, a one-line explanation appears here.
- Item slots — from the left: Heart · Pickaxe · Hint Bulb · Ice Clock · Wings. The x number at the top right of each slot is how many you have, and slots at 0 look dimmed (Chapter 10).
Around the board there’s scenery and weather that changes with each world (petals · snow · rain · fireflies · stars …), but nothing falls on the board itself. The weather is drawn only outside the board so it never steals your eyes at the moment you need to read which way a snake’s head is facing. So the scenery is just for looking at; it has nothing to do with the rules (Chapter 12).
Controls — one tap, the eyes are the arrow
Each snake’s head has two black eyes, and those eyes are the arrow. Tapping anywhere on the body picks that snake. There’s no dragging or pushing. All four edges of the board are exits, so as long as the cells ahead of the head are clear all the way to the edge, it gets out in whichever direction it faces.
| Situation | What happens |
|---|---|
| You tap a snake’s body | That snake runs in the direction its head faces at 15 cells per second. Even a long snake is done within a second |
| You tap an empty cell or an object | If a head is within 0.85 cells of where you tapped, that snake is picked. If not, nothing happens |
| The way ahead is clear to the edge | It escapes off the board. Every body cell brings in 10 H (Chapter 7) |
| Another snake or a troublemaker is ahead | It bumps right there. You lose life and it retraces its path back to the start (Chapter 4) |
| There’s a food on the running lane | It eats it in passing and you get the H Coins on the spot. The body doesn’t grow |
| You tap another snake while one is running | That snake queues up and sets off as soon as the first run ends (only the most recent tap is kept) |
The check isn’t made all at once at the moment you tap — it’s made one cell at a time as the snake moves. So a lane that was empty when you tapped will still cause a bump if a moving troublemaker steps into it mid-run. And a lane that’s blocked now may be fine if you tap after the moving thing has passed. Tapping at the right moment, after something has gone by, is the game’s second pleasure (Chapter 9).

On level 1, if you don’t touch anything for 5 seconds, the game lights up one snake that can leave, along with its path. It doesn’t use up any of your hints. It’s there so a first-time player doesn’t freeze in front of the board.
How to read a board
A board is built by placing one snake at a time, and only in a spot where the cells ahead of its head are clear to the edge. Then several candidate spots are generated and the game picks the one that blocks the paths of the most snakes that can currently leave. So a board is a chain: pull one snake out, and the snake that was stuck behind it opens up. Here’s how to read it.
- First find the snakes whose way ahead is clear all the way to the edge. At the start there are only a few.
- Among those, pull the ones lying across another snake’s path first. The longer a snake lying crosswise, the more snakes are stuck behind it.
- Each time you pull one, look at the lane it just emptied. A snake that faces along that lane is next.
- For a snake with only a red ring ahead, tap it when the ring has sunk into the ground (Chapter 8).
Bumps and life 100
SnakeMaster doesn’t have lives like three hearts; it has a single life bar of 100. It refills to 100 on every board. It’s there to stop you from tapping snakes at random — tap a blocked snake and it always costs you.
| What you bumped | Life lost |
|---|---|
| Another snake | 5 |
| A troublemaker that pops up (rock · log … bomb) | 4–15 — depends on the kind (Chapter 8) |
| A moving troublemaker (bee · hedgehog … lion) | 5–15 — depends on the kind (Chapter 9) |
| The edge of the board | None — all four edges are exits, so there’s no wall |
On a bump, a red mark appears from the head to the blocked cell, the screen shakes and the border flashes red (stronger the more you lost). A number like -5 pops up over the spot you hit, and the snake retraces its path back to where it started. The board is exactly as it was before you tapped that snake, but anything it ate on the way doesn’t come back, and the coins stay with you.
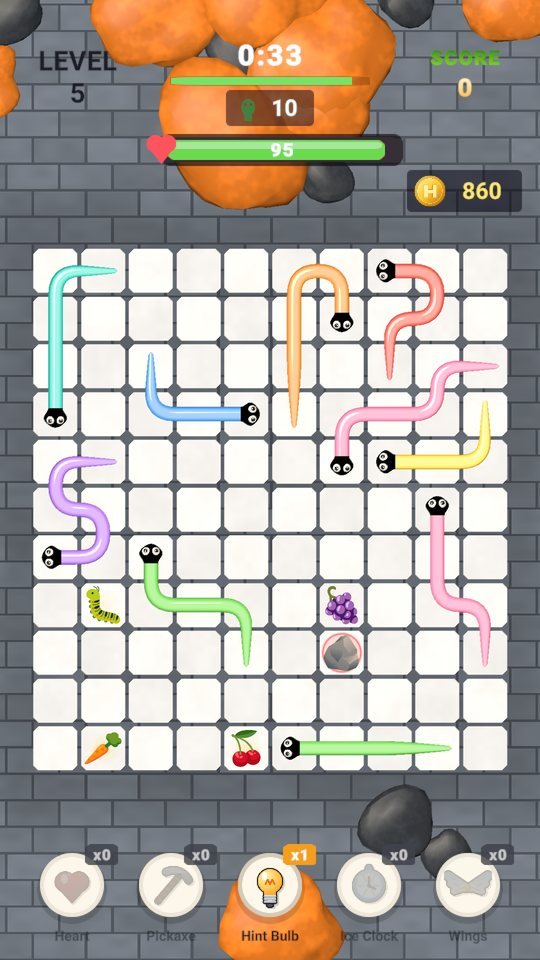

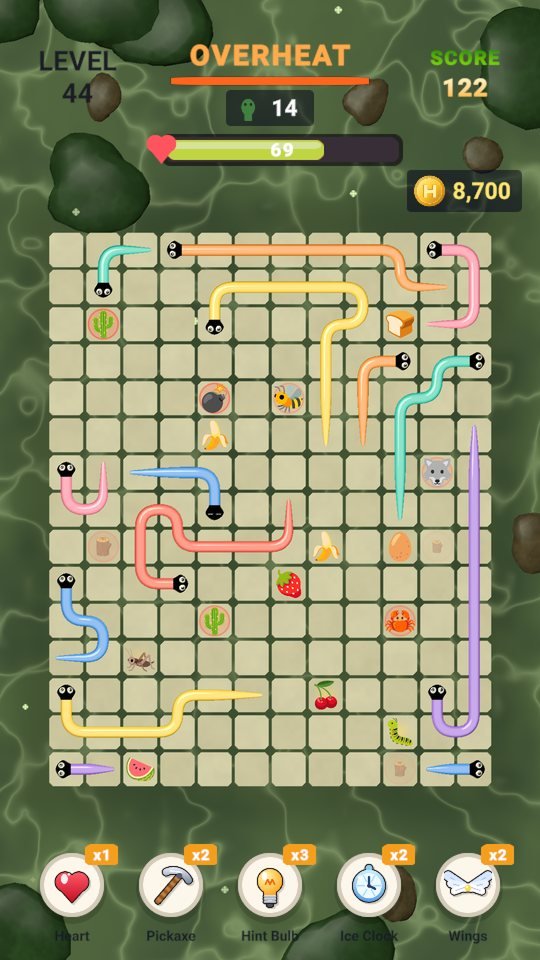
The life bar goes from green to yellow above 50%, from yellow to red between 25% and 50%, and below 25% the red bar pulses like a heartbeat. The portion you lost hangs for 0.28 seconds, like in a fighting game, and then drains down slowly. The first time you tap something, the hint line says Bump into something and you lose life, and the first time you lose life you see Red rings hurt! Tap while they sink into the ground — each once.
Time and overheat — time is life
The clock at the top doesn’t count down a time limit; it counts down the par time. Clear the board within par and you get three stars (Chapter 6); go over and you don’t lose right away. But from the moment you pass it, the board goes into OVERHEAT.
| Board | Par time | Example |
|---|---|---|
| Normal board | 15 s + 2 s per snake | 10 snakes → 35 s · 25 snakes → 65 s |
| Bonus board (every 10 levels) | 10 s + 1.2 s per snake | 36 snakes → 53 s |
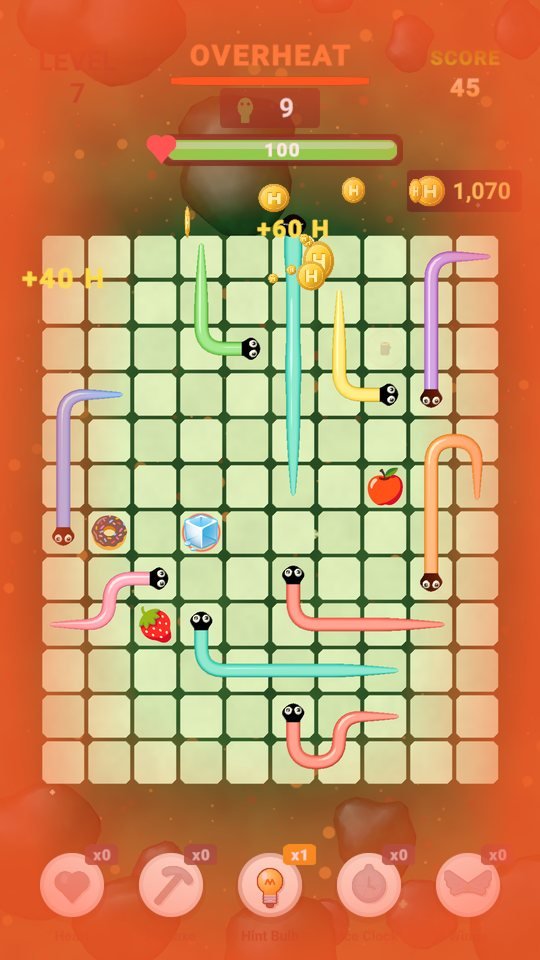

When overheat starts, the Overheat! The board is closing in banner appears and three things change.
- Life drains every second. At 2 + level ÷ 30 per second, capped at 5. On level 4 that’s about 2.1 per second, on level 30 it’s 3, on level 60 it’s 4, and from level 90 it’s 5. It drains quietly with no shaking, and you hear a “tick” every time 10 is lost. The first time it drains, Too slow! Life drains every second — hurry or freeze time shows once.
- One more moving troublemaker can appear (from level 6).
- The gap before the next troublemaker appears shrinks from 7 seconds to 4.
- Levels 1–3 — the clock reaches 0 and ‘OVERHEAT’ shows, but life doesn’t drain. These are the learning boards.
- Bonus boards — there is no overheat at all.
- The 5 seconds an Ice Clock runs — life doesn’t drain. The clock (for the star check) keeps running as normal.
- While paused, during ads, in the shop, in the buy window or during an item’s activation effect, the clock stops.
The reason for overheat is left in a code comment: “If going past par costs nothing, you can just think slowly, and there’s no reason to use items.” So time became life.
Score · combos · stars
| When | Score |
|---|---|
| A snake leaves | 10 + 2 × body length (22 points for 6 cells) |
| Combo — another snake leaves within 4 seconds of the last | From combo 2, you get (combo − 1) × 5 extra. From combo 3 the Combo N! label shows |
| Clear | Life remaining + 50 if perfect |
| Stars | number of stars × 30 |
A bump resets your combo to 0. Perfect means you finished the board without a single bump and without using a hint. Keep perfect boards going for 3, 6, 9 … in a row and a banner like 3 perfect in a row! appears. Your remaining life counts directly as score, so life lost to overheat also costs you points.
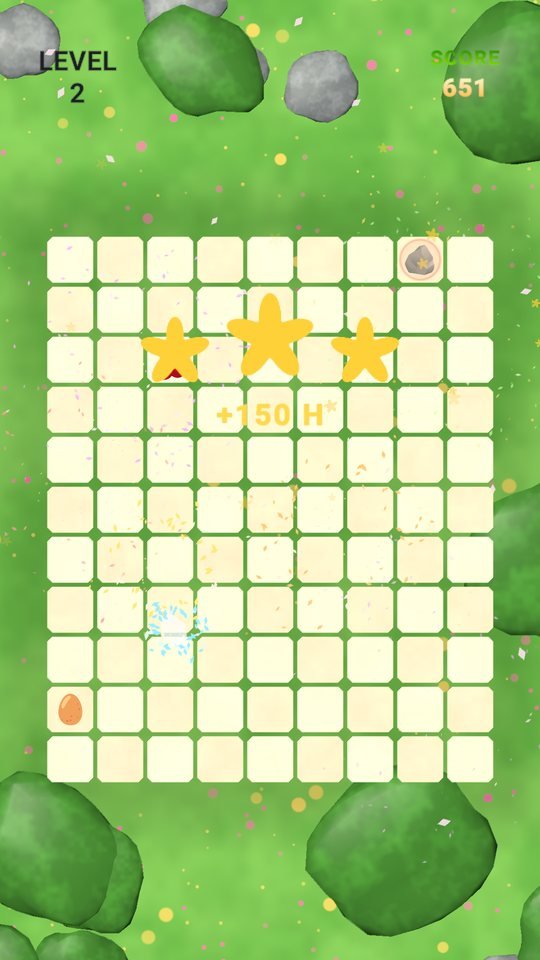

Board emptied within par time. Bonus +150 H.
Within twice par time. Bonus +60 H.
It took longer than that. No bonus. You never lose because of stars.
Twenty foods and H Coins
Some of the empty cells on the board hold a food on top of a golden circle. When a running snake’s head passes over that cell, it pops and is eaten on the spot, a gold coin flies up to your H Coins, and text like +50 H appears. The body doesn’t grow. Whenever it looks like coins are lying on the board, those are coins in flight — there are no pick-up coins scattered on the board.

- The 16 still foods appear from level 1. Each board draws 3 + level ÷ 8 of them (3–10), one cell at a time while the board is built. The more common a food, the cheaper it is: apple · banana · cherry · strawberry (10 H) make up nearly half of all of them, while the cake (250 H) turns up about 2 times in 247 (roughly 0.8%).
- The 4 moving foods show up while the board is running. One on levels 2–7, and up to two from level 8. The frog (100 H) appears from level 2, the caterpillar (50 H) from level 3, the cricket (80 H) from level 5 and the mouse (200 H) from level 8. They’re foods you have to tap just as they enter your lane, so they’re worth more.
- Eating 100 H or more makes a louder eating sound. The first time you eat, Food = H-coins! Run over it to eat shows once.
| Where H Coins come from | Amount |
|---|---|
| A snake escaping | 10 H per body cell (head · body · tail alike). On a bonus board it’s doubled |
| Foods | 10–250 H depending on the picture, the moment you eat |
| Clearing | (3 + snakes ÷ 5 + 2 if perfect) × 10 — 70 H with 10 snakes and a perfect run |
| Stars | ★★★ +150 · ★★ +60 |
| Today’s missions | 200 H each, doubled if you watch an ad (Chapter 13) |
| Ad recharge in the shop | 3,000 H (Chapter 13) |
By the game’s own math, one board brings in about 900 H on level 1, about 1,550 H on level 30 and about 2,100 H on level 100. Escapes are the biggest share, and foods make up around 20%. Set that next to the item prices (1,500–4,000 H) and you get “one cheap item per board, two or three boards for an expensive one.”
Troublemakers 1 — the ten that pop up and sink
The red rings on the board are troublemakers. The ten still kinds are always placed on the path some snake leaves by, and they keep repeating the same cycle in place: up above the ground (blocking), then down underground (passable). If you tap a snake on that lane while one is up, you bump and lose the life shown in the table. The first one appears on level 2, and each board lays down 1 + level ÷ 6 of them (up to 1/30 of the number of cells on the board).


- The time up is 1.8–3.0 seconds and the time down is 1.6–2.4 seconds, each starting at a different value, so they don’t all keep the same beat. As the levels climb, the time up gets longer (+45% around level 60) and the time down gets shorter (-35%).
- They blink starting 0.6 seconds before they pop up. When they’re down they look small and faint. Once one starts blinking, don’t tap a snake on that lane.
- If a snake’s body or something else is on that cell, it doesn’t pop up and waits.
- They don’t disappear when you bump them. They just flinch and flash red. The only way to get rid of one is the Pickaxe: tap it and every still troublemaker on the board is smashed, then they pop back up in the same spots 5 seconds later (Chapter 10). An Ice Clock freezes their rhythm for 5 seconds — the ones that are up stay up, the ones that are down stay down.
- Boulders (from level 25) take up four cells at once.
The code says these started as “tolls” that broke when you hit them, then someone pointed out that “obstacles shouldn’t vanish,” and that’s how the pop-up-and-sink design came about. Thanks to that, troublemakers stay on the board and yet the board is always solvable. The only life you lose is for the times you tapped wrong while one was up.
Troublemakers 2 — the ten that move, and the hunters
From level 6, troublemakers that wander the board show up. The number that can be on a board at once is one on levels 6–15, two on levels 16–25 … five from level 46, and one more once overheat starts. The first time one appears, Moving troublemakers! Wait for a clear lane shows.

| Movement | Who | How |
|---|---|---|
| Walking | Hedgehog · spider · scorpion · tiger · lion | One cell at a time, in the order forward → sideways → back |
| Fluttering | Bee · bat | Flies around, changing direction often |
| Sideways | Crab | Fast, left and right only |
| Fast | Wolf | Runs at short intervals |
| Hopping | Bullfrog (2×2) | Jumps two cells at a time. The view is from above, so it looks like its body grows while it jumps |
- The four hunters — scorpion (level 22) · wolf (28) · tiger (34) · lion (40) don’t go just anywhere. They head for the nearest of the cells in front of the heads of snakes that can leave right now and stay there a moment. One time in four they move randomly so they can’t be read. In other words, the longer you think, the more open paths close one by one.
- Troublemakers never appear in the cell right in front of a snake’s head (you’d have no time to dodge). And since they need an empty cell to appear in, you’ll rarely see them at first when the board is packed, and they increase as snakes leave.
- A single one stays for 18–26 seconds and then leaves; if it fails to move four times in a row, it leaves early.
- Dead-end rescue — if moving troublemakers leave no snake able to get out (checked every 2 seconds), all of them leave, and no new ones come until a snake has left.
The five items
The items sit in five slots at the bottom of the screen, and tapping a slot mid-round uses it right away. While a snake is running or during 3 · 2 · 1, tapping does nothing. When you use one, the item pops out of its slot with its own animation and sound. The Pickaxe, Ice Clock and Wings put a big picture in the middle of the board with Smashing all the rocks! · Everyone, freeze! · A snake takes flight!; the Heart flies from its slot up to the life bar; and the Hint draws a red path from a snake’s head to the edge of the board with This snake can get out!. You start with 0 of every item (only the hint is one free per board); buy them in the shop with H Coins, or tap a slot that’s at 0 to buy on the spot. A bought item doesn’t go away until you use it.
| Item | Price | Shop description | What it really does |
|---|---|---|---|
| Heart | 3,000 H | Restores 40 life. Also saves you once at 0 | The moment life hits 0, it uses one automatically and revives you at 40. If you tap it yourself, it restores +40 (up to 100). If you’re already at 100, it isn’t used |
| Hint Bulb | 1,500 H | Draws a snake’s way out in red | Of the snakes that can leave now, it makes the longest one glow gold and draws its path from the head to the edge of the board as a red line three times, then clears it. If no snake can leave, it points out a snake that only troublemakers are blocking. One free per board. Using it means the board isn’t “perfect” |
| Pickaxe | 2,500 H | Smashes every rock. They stay away for 5 seconds | The instant you tap it, all ten kinds of still troublemakers on the board are smashed (up or sunk, a boulder all four cells). 5 seconds later they pop back up in the same spots (if a spot is taken, as it frees up). If the board has no still troublemakers, the count doesn’t drop and only No rock to smash appears. It can’t smash moving ones |
| Ice Clock | 2,000 H | Everything stops for 5 seconds | For 5 seconds: (1) moving troublemakers and foods freeze in place (the spot still blocks) and no new ones appear; (2) the pop-up-and-sink rhythm of still troublemakers stops too — the ones that are up stay up, the ones that are down stay down; (3) life doesn’t drain from overheat. Using it again adds time |
| Wings | 4,000 H | A stuck snake flies out on wings | The longest of the snakes whose way is blocked flies over what’s blocking it and off the board. If no snake is blocked, the longest snake left on the board flies. No bump, and the escape coins are the same. It’s only not used when there are no snakes on the board |
The shop’s descriptions are short summaries, so a few things don’t fit in one line. The Pickaxe doesn’t smash only rocks — it smashes every still troublemaker at once: logs, ice, fire and bombs included. The Ice Clock freezes not only the moving ones but also the pop-up-and-sink rhythm of the still ones, right where it is (it no longer opens paths the way it used to). Wings pick the longest of the blocked snakes, and the Heart can also be tapped by hand to fill 40, not only when you reach 0.

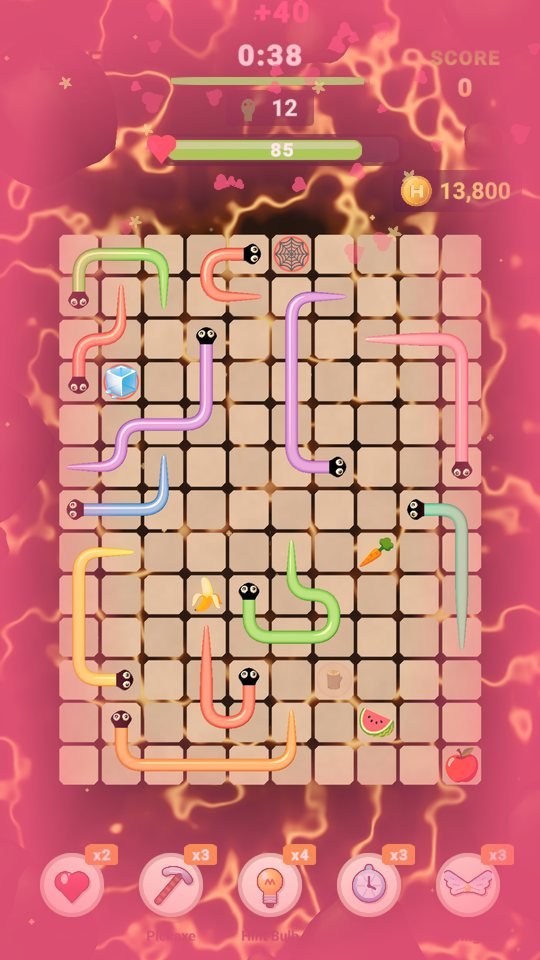
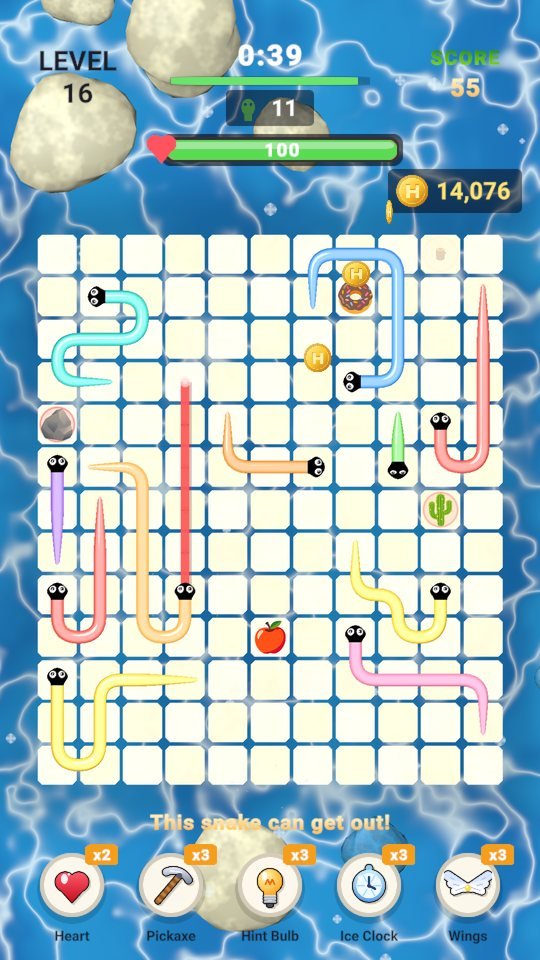
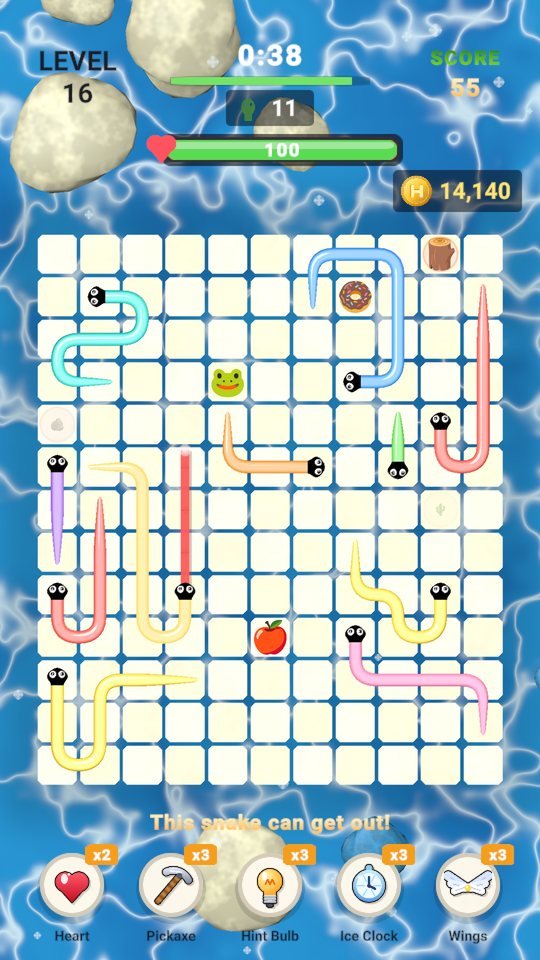

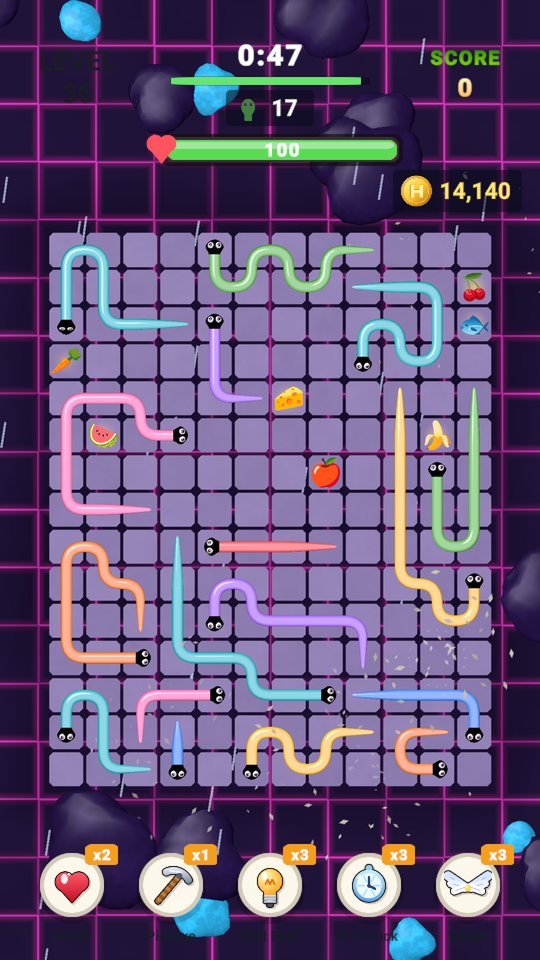
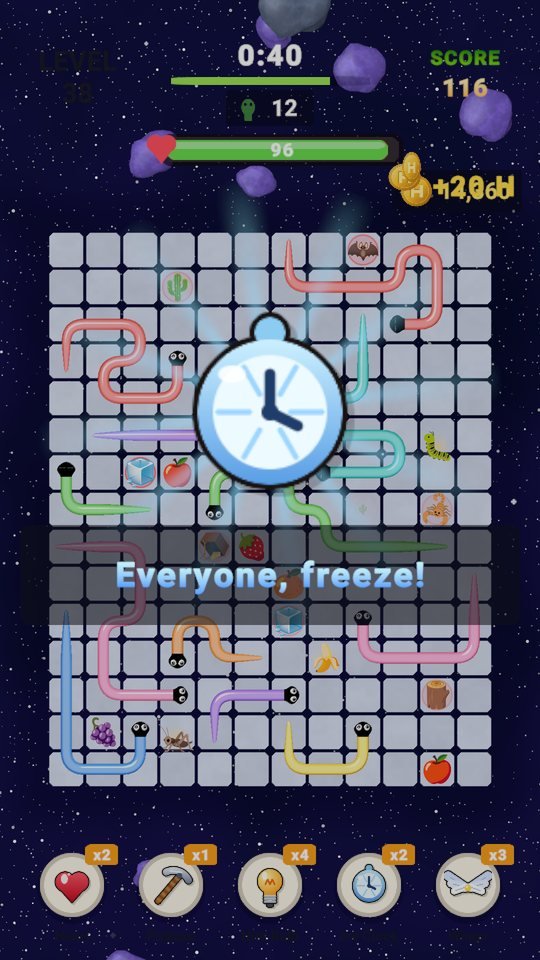

Tapping a slot at 0 — buy on the spot

If you have enough coins, a window appears with the item’s picture, name, price and You have N H, along with Buy this item with H-coins?, and you choose Yes or No. Yes pays the price and activates it right away. If you’re short on coins, the price line changes to Free with an ad and Watch an ad to buy? appears. If you finish the ad, no coins are paid or added and one item activates immediately (one ad = one item). If no ad is ready, you see Ad isn’t ready yet. Try again in a moment.
A bought item never sits at x1 waiting for a second tap. While the window is open, the board (clock · overheat · troublemakers) is paused. The coins and item counts in this photo were filled in for the shoot.
The bonus board — every 10 levels
On 10 · 20 · 30 … every level that’s a multiple of 10 is a bonus board. At the start, BONUS! Clear them all — exit coins x2 appears, and the board is completely different.

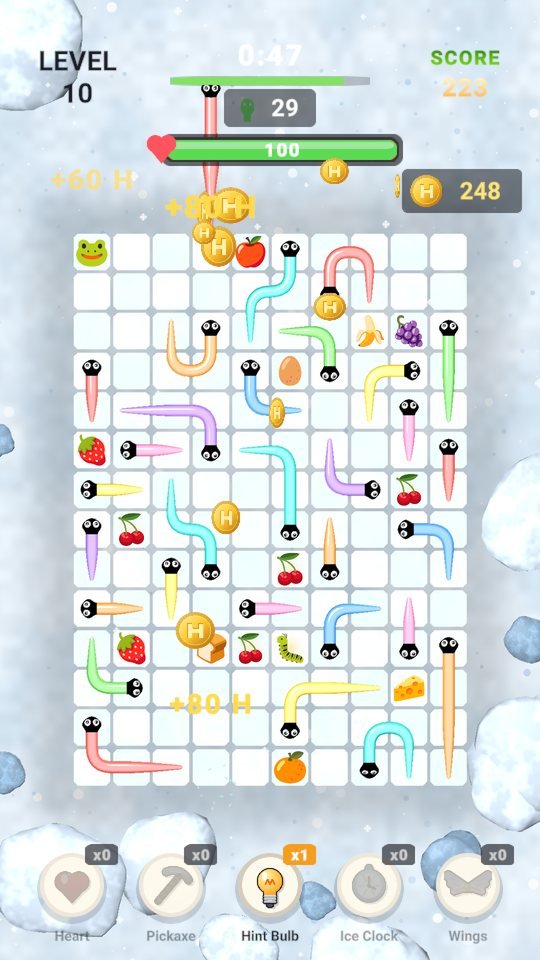
| Normal board | Bonus board | |
|---|---|---|
| Snakes | 3–13 cells, 10–25 snakes | Short snakes of 2–4 cells, up to 50 |
| Troublemakers | Still ones · moving ones | None |
| Foods | 3–10 + 0–2 moving | 14 + 3 moving |
| Escape coins | 10 H per cell | 20 H per cell |
| Par time · overheat | 15 s + 2 s per snake · overheat on | 10 s + 1.2 s per snake · no overheat |
It’s a design split: the bonus board supplies the “wow, so many!” feeling while normal boards stay focused on the fun of reading. Short snakes mostly open up quickly, so it’s fine if your hands move a bit ahead of your thinking. Par time is set short, so you have to keep pulling without a pause if you want three stars.
Levels and difficulty · the twenty-two worlds
There’s no last level. The higher the level, the bigger the board, the longer the snakes, the more turns they have and the more troublemakers there are. The table below is the game’s own formulas with the level plugged in (snake count is the cap for that level).
| Level | Board (W×H) | Snake length | Snakes (cap) | Still troublemakers | Foods | Overheat drain/s |
|---|---|---|---|---|---|---|
| 1 | 9×11 | 3–6 cells | 10 | 0 | 3 | none |
| 15 | 11×12 | 4–7 cells | 12 | 3 | 4 | 2.5 |
| 25 | 11×13 | 4–9 cells | 14 | 4 | 6 | 2.8 |
| 61 | 12×15 | 4–13 cells | 22 | 6 | 10 | 4.0 |
| 121 | 13×16 | 4–13 cells | 25 | 6 | 10 | 5 |
| 1001 | 14×18 | 4–13 cells | 25 | 8 | 10 | 5 |
Snake length reaches its cap around level 56 and snake count around level 121; after that only the board size and the number of still troublemakers grow slowly. Levels ending in 5 have a board one row shorter and levels ending in 0 have one row longer, so each board has its own rhythm. A board is built from a seed set by the level number, so Retry usually gives you the same board again.


A new world every 3 levels
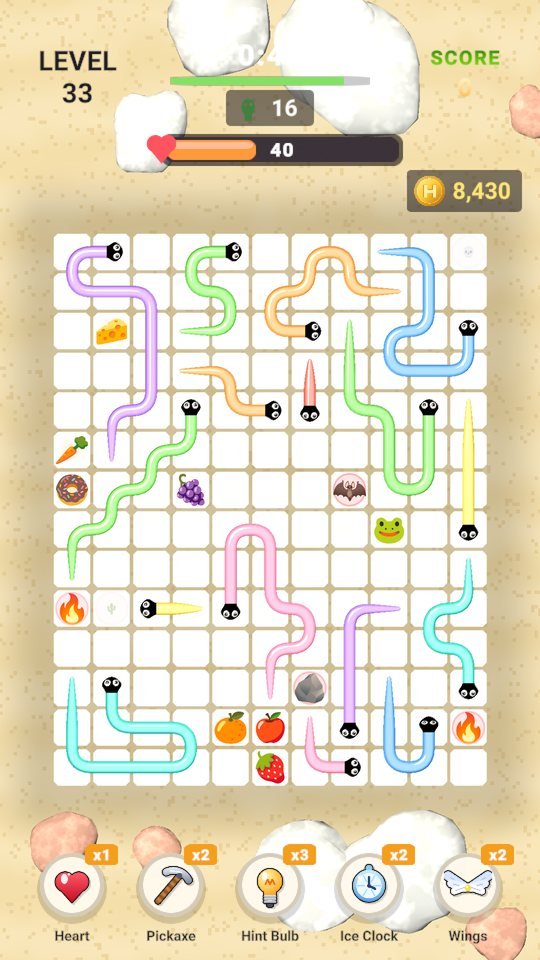
The scenery around the board changes every 3 levels and goes full circle at level 66. Each world comes as a set: ground pattern, board color, lighting and weather. On the first board of a new world the hint line shows the world’s name for 2.5 seconds (level 1 and bonus boards show their own hint first, so no name appears). The board itself is always kept at a calm mid-brightness so the snakes’ eight colors stand out.
| Level | World | Weather | Level | World | Weather |
|---|---|---|---|---|---|
| 1–3 | Sunny Garden | Petals | 34–36 | Neon Night City | Rain |
| 4–6 | Downtown | — | 37–39 | Space Station | Stars |
| 7–9 | Deep Forest | Fireflies | 40–42 | Candy Land | Sparkles |
| 10–12 | Snowfield | Snow | 43–45 | Misty Swamp | Fireflies |
| 13–15 | Burning Forest | Embers | 46–48 | Crystal Cave | Sparkles |
| 16–18 | Open Sea | Bubbles | 49–51 | Rainforest | Rain |
| 19–21 | Golden Desert | Sand | 52–54 | Happy Farm | — |
| 22–24 | Volcano | Embers | 55–57 | Ancient Ruins | — |
| 25–27 | Cherry Blossom Park | Petals | 58–60 | Ice Cave | Sparkles |
| 28–30 | Autumn Woods | Leaves | 61–63 | Coral Reef | Bubbles |
| 31–33 | Sunny Beach | — | 64–66 | Aurora Tundra | Snow |


The bottom bar — shop · missions · achievements · settings
Under the home screen and the result screen there are six slots: HOME · MISSION · ACHIEVE · ITEM · SETUP · MORE. They hide once a board starts, so you can’t accidentally press one mid-play and break your flow.
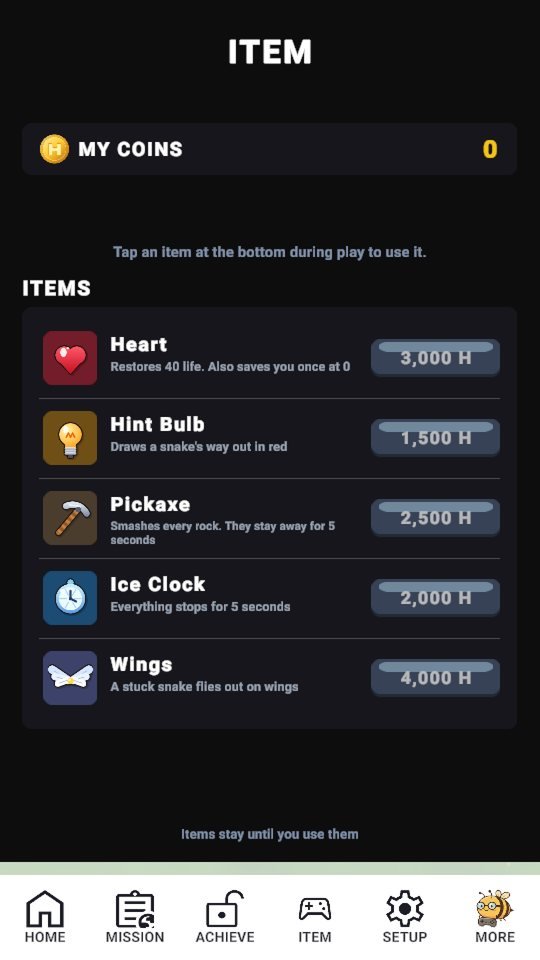

- Items (the shop) — a MY COINS card, WATCH AD FOR 3000 COINS (shown only when an ad is available), the prices and counts of the five items, and at the bottom Items stay until you use them. Each tap buys one.
- Missions — TODAY’s MISSION. The conditions are written in English inside the badge pictures, and they reset at midnight. Each one pays 200 H, claimed with JUST CLAIM or WATCH AD, GET 2X.
| Badge | What to do |
|---|---|
| LEVEL 1 CLEAR | Clear a board for the first time today |
| 5 STAGES CLEAR · 10 STAGES CLEAR | Finish 5 · 10 boards today (a game over counts too) |
| COMBO x1 OKAY | Pull out at least one snake and clear the board |
| COMBO x5 OKAY | Pull out five snakes in a row, each within 4 seconds of the last, and clear that board |
| 3 CLEAR STREAK · 5 CLEAR STREAK | Clear 3 · 5 boards in a row without a game over |
| 10 LEVELS UP | Get 10 levels above where you were when you first came in today |
| WEATHER WIN x3 | Clear 3 boards in worlds that have weather. When the next level you’ll play is in a world without weather (Downtown · Sunny Beach · Happy Farm · Ancient Ruins), this slot is hidden (if you have already completed it, it stays visible) |
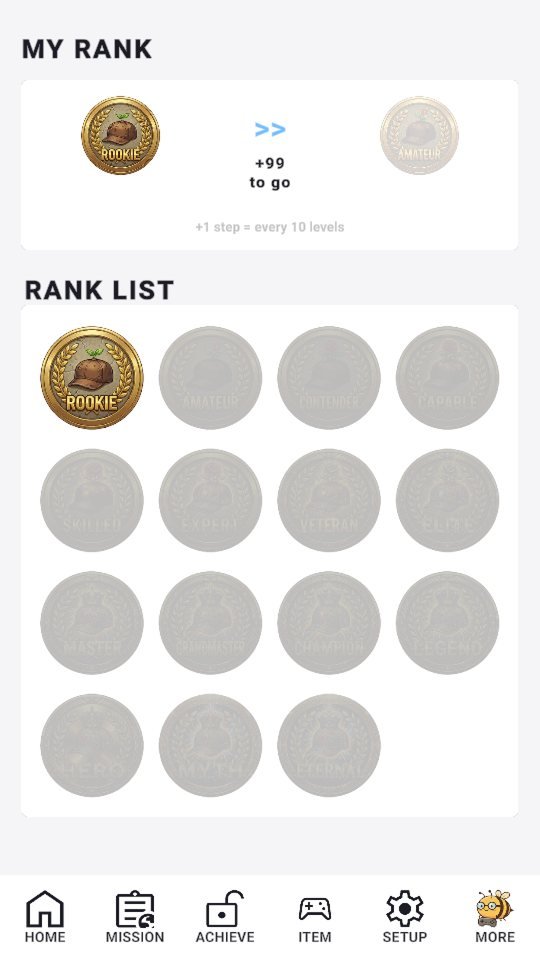

- Achievements — MY RANK. Fifteen gold medals run from ROOKIE to ETERNAL, and the step inside the medal goes up one at a time with +1 step = every 10 levels.
- Settings — nickname (the avatar is one of the eight snake colors, coiled), 10 languages, vibration, sound, push notifications, tutorial, homepage, rate us, contact us, share game, privacy policy, terms of service and so on. There’s no light/dark theme button; each world decides the board’s colors.
- More — opens a page showing HaniLab’s other games.
Clear · Game Over · Continue
On to the next level. There’s no countdown; play starts right after the baby snake parade.
Keeps the board exactly as it is, refills life to 60 or more and carries on. There’s a pink button for watching an ad (AD, only when you’re online and an ad is ready) and a blue button that costs H2,000. If you’re short on coins, the blue button looks dimmed.
The same level from the beginning. Usually the same board is built again, and your score goes back to what it was when you started that board.
SnakeMaster doesn’t shove an ad in your face just before you lose. It shows the result screen first and lets you choose for yourself whether to continue. Ads between boards also come only from level 10, only when you tap NEXT after a clear, once every several boards (every 8 at first), and at least 2 minutes after the previous ad.
Continue only refills life; it doesn’t turn the clock back. If you lost during overheat, your life keeps draining after you continue. As soon as you continue, use an Ice Clock and life doesn’t drain for 5 seconds — use that time to pull out the snakes that can leave right away.
Six things for first-timers
- The eyes are the arrow. Tap a snake and it runs straight where its head’s eyes look. First check whether the cells ahead are clear to the edge.
- Don’t tap a blocked snake. A snake bump costs -5, a troublemaker -4 to -15. The 100 life on each board is all you have.
- Start with snakes lying across another’s path. Pull one, and the snake that faces the lane it emptied is next.
- Red rings: tap when they’re down. Still troublemakers pop up and sink. Once one starts blinking, it pops up 0.6 seconds later.
- Pass par time and it overheats. From level 4, life drains every second. When the clock turns red under 10 seconds, pull snakes out quickly.
- One hint per board is free. If you’re stuck, tap the bulb in the bottom middle. It shows a snake’s way out three times (the board then no longer counts as “perfect”).
Tips from experienced players
- Read the board during the countdown. 3 · 2 · 1 counts with the board showing. If you’ve already found the snakes that can leave, you can pull the first few within 4 seconds of each other and get combo bonuses.
- Use queued taps. While one snake is running, tap the next one and it waits in line, then sets off right away. Your 4-second combo doesn’t break.
- Go first for snakes with a food on their lane. Coins eaten in passing stay even if you bump afterward. Catch the mouse (200 H) and the frog (100 H) just as they enter your lane.
- Hurry when the hunters arrive. From level 22, scorpions · wolves · tigers · lions come to block the front of “snakes that can leave right now.” An open path is best used while it’s open.
- The Pickaxe is a 5-second race. While every still troublemaker is smashed, pull out the snakes they were blocking one after another. After 5 seconds they pop back up in the same spots.
- Use the Ice Clock when overheat starts. For 5 seconds life doesn’t drain, and moving troublemakers freeze and no new ones appear. It doesn’t open any paths, so pull out the snakes that can leave right now, fast.
- Wings send off the longest of the blocked snakes. Use them on a board that’s jammed solid and you can’t see an answer, and a whole chain comes undone.
SnakeMaster supports 10 languages: English, Korean, Japanese, Chinese, German, French, Russian, Spanish, Portuguese and Turkish. Like the other games in the Master series, it’s made to be played one-handed, in short sessions. In the next posts we’ll take a deeper look, one post each, at troublemakers · items · overheat · H Coins · the twenty-two worlds.
Follow the eyes, one snake at a time.
How many will you free today?

Play SnakeMaster now
Playing it is much faster than reading about it.
Find the other Master Series games all in one place at hanilab.app.

More from this game
 Before and After the Bump: What Happens When You Hit Something in SnakeMaster, in Four Scenes
 Go Again Within 4 Seconds: Stacking the SnakeMaster Combo Bonus in Five Steps
 SnakeMaster First Run Diary: From Level 1 to Level 5, a Beginner’s Log
 SnakeMaster Worlds — From the Sunny Garden to the Aurora Tundra, a Lap of 22 Worlds in 66 Levels
🌌 Universe stories
 Roddy Universe, Part 2 — Fallen Down, Only One Step Back at the Roadside
 Roddy Universe, Part 1 — One Beat Before Crossing, the Empty Road Between the Cars
 Bombi Universe, Part 2 — Behind You: The Reaper That Walks Through Walls
Try other games
 FindMaster
 LottoMaster
 TakMaster


