

There is not one pre-drawn picture.
The room is built fresh every time
A cup on the kitchen table has turned red. A donut that wasn’t there yesterday sits on the plate, and in the mirror only the teapot has slid a little to the side. FindMaster never uses a stored picture. The game builds a room, changes a few things, and draws it twice.

This FindMaster guide covers everything in the game, in order: the screen layout and controls, hearts and the clock, 36 puzzle types and 18 pick rules, the order in which new types unlock, how a tap is judged, H Coins and score, the five items, and the six rooms with their 41 objects. Every number and on-screen phrase was checked against the game source. If you are new, jump straight to the six tips for first-time players at the bottom.
- What kind of game FindMaster is
- The screen layout: where to look
- Controls: one tap, plus dragging the flashlight
- Hearts and the clock: how you lose
- 19 modes: one picture, two pictures, answer buttons
- 18 pick rules
- The unlock order: all 36 types by level 4
- How the time limit is calculated
- Judging taps: a touch area sized for fingers
- Score, H Coins, combo, perfect
- The five items
- Six rooms and 41 objects
- Daily reward, continue, hints
- Six tips for first-time players
What kind of game FindMaster is
It is a spot-the-difference game, with one twist: the pictures are not drawn in advance. Inside Unity, the game lays out 3D objects by rule to make a room, changes a few of them, and renders the scene twice into an upper and a lower picture. Because the game knows every object, answers are judged by object ID and screen area, not by comparing pixels. No outside AI or server is called, so building a puzzle happens entirely on your device.
That means the same board never shows up twice, and puzzles are generated even in airplane mode (ads, the leaderboard and push notifications use the network separately). The game code is 0036.
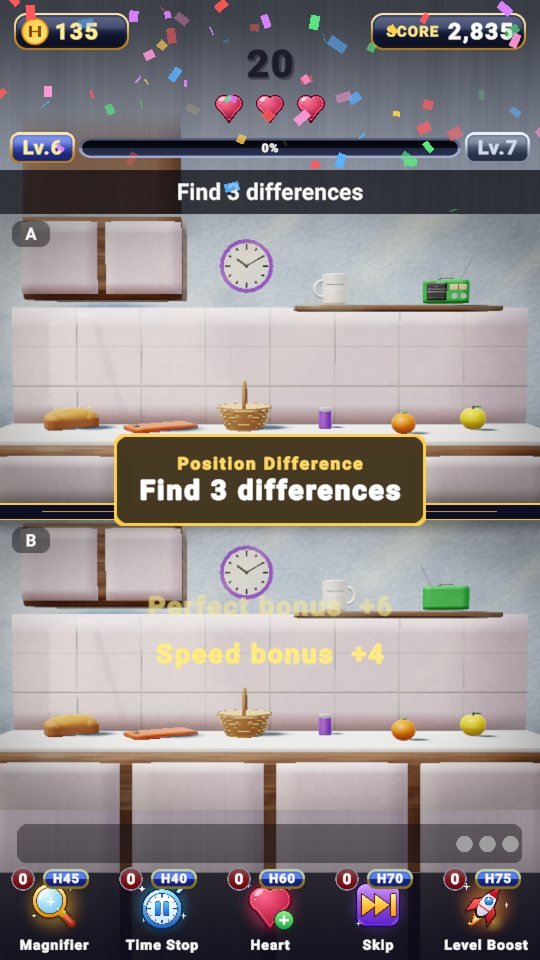
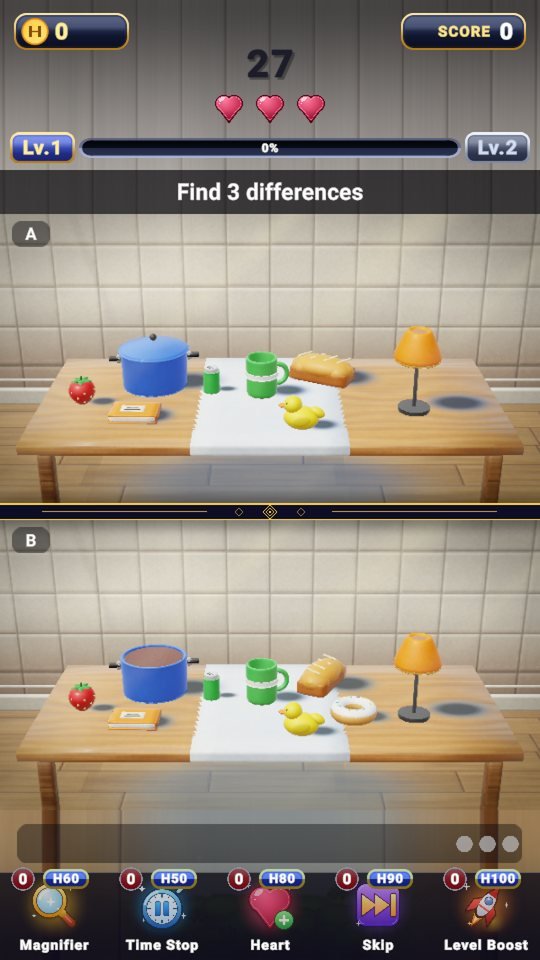 Real game screen: A on top, B below, and the prompt “Find 3 differences” above the pictures.
The screen layout: where to look
The screen is vertical. Score and clock sit at the top, the picture in the middle, and the item row at the bottom. Everything left over after the top 340 and bottom 300 (on a 1080×1920 reference canvas) belongs to the picture.
- H Coins and score: your H Coins at the top left, the SCORE at the top right. The big number in the middle is the time left, in seconds.
- Level bar: the bar beside Lv.1 shows how close you are to the next level.
- Prompt strip: this round’s goal in one line, for example Find 3 differences.
- Picture area: with two pictures, A on top and B below sit with one gold line (34px) between them. With one picture, it uses the whole strip.
- Three hearts and progress dots: the hearts on the left are your lives, the dots on the right count what you have found. A dot fills green when you find an answer. A streak shows up as text like Streak ×3 (from 2 upward).
- Item row: Magnifier, Time Stop, Heart, Skip and Level Boost, five buttons.
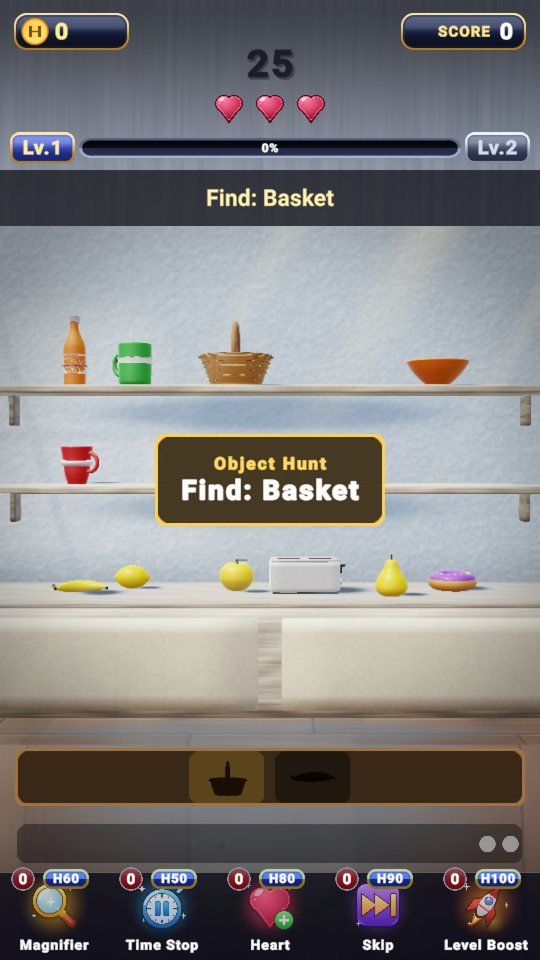
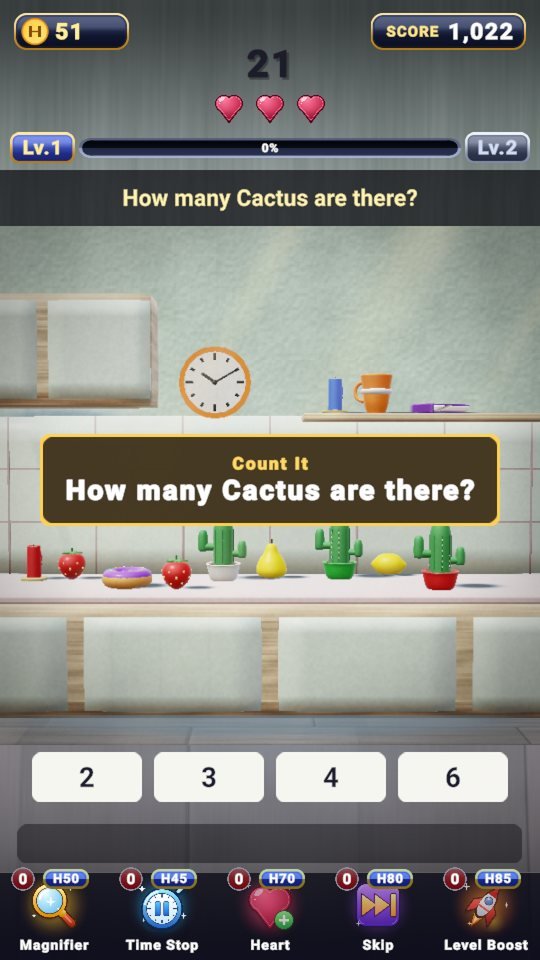
One-picture puzzles (Object Hunt, Reflection, Memory, Odd One Out, Flashlight Hunt, Pick It, Count It, Remember the Order) show one large picture. Object Hunt and Flashlight Hunt add a silhouette tray below for the objects you must find, and each slot fills with color when you find it. Counting puzzles get a strip of answer buttons underneath.
Controls: one tap, plus dragging the flashlight
Input is almost entirely a single tap. Pressing inside a picture converts the touch point to a position within the picture (0 to 1), which is what gets judged. There is no long press and no zoom.
With two pictures, tapping either A or B counts as the same spot. Tap the difference once; you never need to tap both sides.
Counting puzzles (How many Cactus are there?, Which picture has more?) are answered with the buttons below. A wrong answer costs a heart.
In Flashlight Hunt, press and drag inside the picture and the circle of light follows you. The spot where you lift your finger is your choice.
All five buttons at the bottom are taps too. If you have stock, it uses stock; if not, it pays H Coins on the spot.
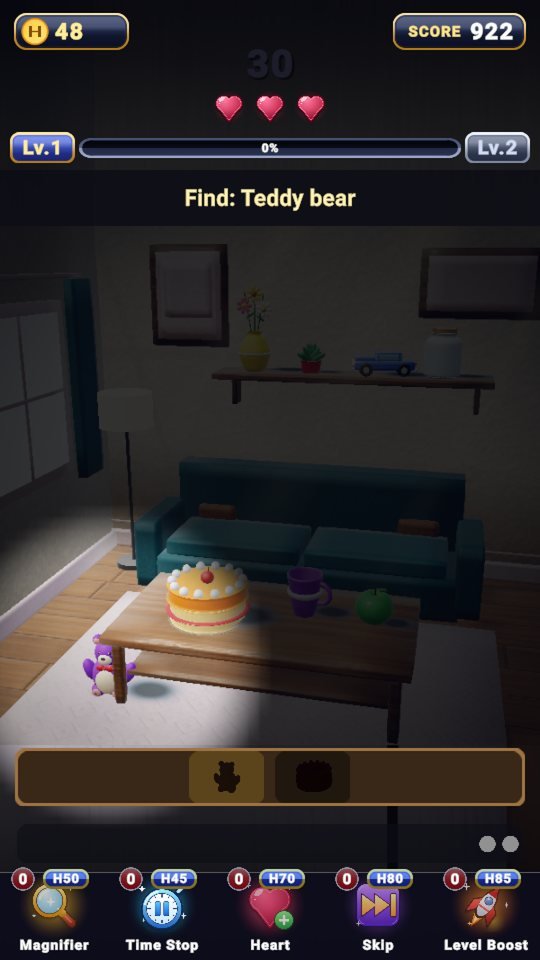 Flashlight Hunt: only the circle of light is visible. “Find: Teddy bear” on top, a silhouette tray below.
Taps do nothing while you are memorizing. In Memory Match and Remember the Order, both the clock and your input are paused while the picture is shown.
Hearts and the clock: how you lose
There are two ways to lose: all three hearts are gone, or the clock reaches 0. When time runs out, Time’s up! appears in the middle.
- One wrong tap = one heart, and that round’s combo goes back to 0. The screen shakes and the phone vibrates.
- A second tap near the same spot within 0.45 seconds is not counted as wrong. It exists so that a finger that lands twice doesn’t cost two hearts.
- Tapping an answer you already found again is not a mistake.
- In ordered puzzles (Object Hunt, Flashlight Hunt, Remember the Order, Big to Small / Small to Big), only the answer whose turn it is counts. Tapping another answer spot first is a miss.
- You get 1 heart back each time you level up (max 3). Items can refill hearts too.
- The clock is set fresh for every board, and leftover time never carries over. It stops during Time Stop, during the memorizing phase, and during the 3-2-1 countdown at the start of a board.
When a board starts, the screen transition (tiles cover the screen and the level number appears) and the 3-2-1 play first, then the goal text appears. The clock starts running from that point.
19 modes: one picture, two pictures, answer buttons
The game has 19 puzzle modes. Pick It splits into 18 rules, so the puzzles you can actually be asked come to 36 types. The number of answers varies a little with difficulty.
| Mode | Pictures | Rule | Answers |
|---|---|---|---|
| Find the Differences | Two | A mix of color, material, move, rotate, size, disappear, appear, state and shadow | 3-7 |
| Object Hunt | One | Find the objects that match the clue, one at a time (tray below) | 2-3 |
| Count the Difference | Two | Which picture has more? / How many more? | 1 (answer button) |
| Color Difference | Two | Only color and material change | 3-6 |
| Position Difference | Two | Only moves and rotations | 3-6 |
| Size Difference | Two | Only size changes | 3-6 |
| Missing Object | Two | Objects that vanished or appeared | 3-6 |
| Shadow Difference | Two | A contact shadow removed, flipped to the other side, or stretched 1.65 times | 2-4 |
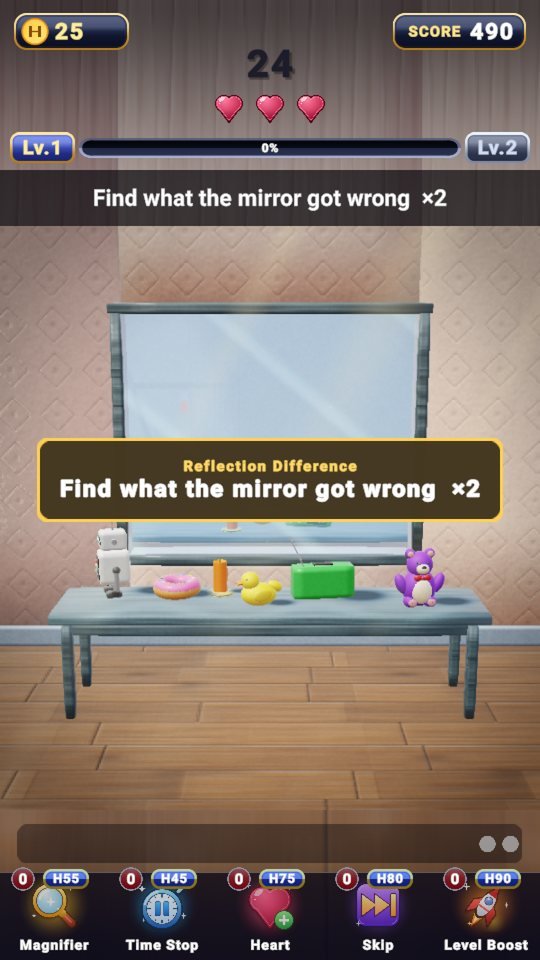
| Reflection Difference | One | Only the copies in the mirror are off (color, vanished, shifted). Mirror room only | 2-3 |
| State Difference | Two | Objects with two or more states: lamp on or off, lid, open book, clock hands, filled cup | 2-5 |
| Memory Match | One spot | The clock stops while you memorize, then you find what changed | 2-4 |
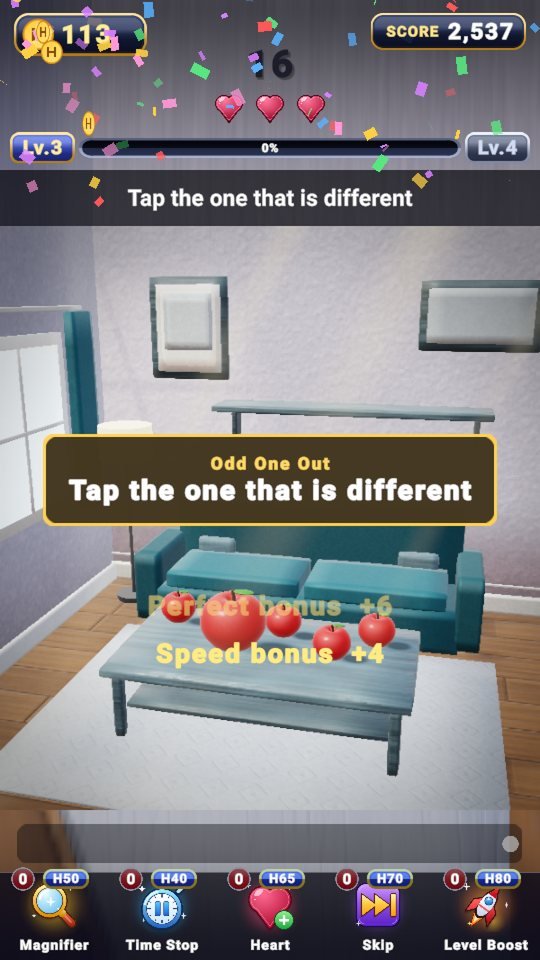
| Odd One Out | One | One among many is different (Tap the one that is different) | 1-2 |
| Flashlight Hunt | One | Find the clue objects in a dark room with a circle of light | 2-3 |
| Pick It | One | Tap the objects that match a rule (18 rules in the next chapter) | Set by the rule |
| Count It | One | How many Cactus are there? with answer buttons | 1 |
| Remember the Order | One | Memorize the order of numbered objects, then tap them in the same order | 3-5 |
| Turned Around | Two | Only rotations | 3-7 |
| Lightning Round | Two | A spot-the-difference with few answers and a short clock | 2-3 |
| New Arrival | Two | Only objects that appeared | 3-7 |

18 pick rules
The rule in Pick It changes every round. Below is the list with the on-screen sentences as the game words them (the { } slots are filled with a color, object, type or place).
| Rule name | On-screen sentence |
|---|---|
| Color Hunt | Tap every {color} object |
| Find All | Tap all: {object} |
| The Biggest | Tap the biggest object |
| The Smallest | Tap the smallest object |
| Far Left | Tap the leftmost object |
| Far Right | Tap the rightmost object |
| The Highest | Tap the highest object |
| The Lowest | Tap the lowest object |
| Big to Small | Tap the 3 biggest, biggest first |
| Small to Big | Tap the 3 smallest, smallest first |
| Sort by Type | Tap all: {type} (Kitchenware, Food, Furniture, Home goods, Plant, Toy, Stationery, Decoration) |
| Where Is It? | Tap everything {place} (on the table, on the counter, on the shelf, on the desk, on the floor, on the wall) |
| Material Hunt | Tap all: {material} (wooden, metal, glass, ceramic, fabric or plastic object) |
| All But One Color | Tap everything EXCEPT {color} objects |
| All But One Type | Tap everything EXCEPT: {type} |
| Most Common | Tap the object there are the most of |
| One of a Kind | Tap every object that appears only once |
| Dead Center | Tap the object closest to the center |
 Pick It: “Tap everything EXCEPT Red objects”. You have to tap every object that is not red.
Ambiguous rules are never served. The biggest or smallest object must differ in area by at least 1.35 times, and neighbors in a Big to Small / Small to Big run must differ by at least 1.22 times. Position rules need a screen difference of 0.07 or more, and if too few objects are visible the rule misfires and the game moves on to another one. Big to Small / Small to Big must be tapped in the set order.
The unlock order: all 36 types by level 4
You don’t get all 36 types at the start. New types open as you level up, and by level 4 all 36 are open.
| Level | Newly unlocked types | Count |
|---|---|---|
| 1 | Find the Differences, Object Hunt, The Biggest, Missing Object, Find All, Odd One Out, Dead Center | 7 |
| 2 | Memory Match, Color Hunt, Far Left, Flashlight Hunt, The Smallest, Color Difference, Far Right, Position Difference, Count It, One of a Kind, Most Common | 11 |
| 3 | Sort by Type, Lightning Round, The Highest, Size Difference, The Lowest, Remember the Order, Big to Small, Material Hunt, State Difference, All But One Color | 10 |
| 4 | Where Is It?, Small to Big, Turned Around, Count the Difference, New Arrival, Shadow Difference, Reflection Difference, All But One Type | 8 |
- A type does not repeat until you have gone through the whole lap. Every unlocked type shows up once before any comes around again.
- The game also avoids serving the same family back to back: spot-the-difference, hunt, pick, memory, counting, odd-one-out and mirror.
- The first puzzle of a level that unlocks a new type is that new type (from level 2). The first puzzle of level 1 is always Find the Differences.
- Levels 1 and 2 are pinned to low difficulty, and up to level 5 newly unlocked types start out easy.
How much the level bar fills differs by level. Levels 1 and 2 take about 3 boards, the requirement grows slowly as you climb, and it stops growing at 14 from level 28. A clean clear fills the bar a lot, one mistake fills it less, and using more than 60% of the time cuts it a little further. With the Level Boost item on, that round fills it double.
 Memory Match: “Memorize this picture!” with a countdown. The clock is stopped while you memorize; the time runs from 6.5 to 3.5 seconds depending on difficulty and grows with the number of answers.
How the time limit is calculated
The clock is computed from the puzzle type, the level and the number of answers. Once it is calculated, it doesn’t change until the board ends.
Time = (start value – (level – 1), but not below the minimum) + the per-answer add for each answer + levels 1-3 practice slack (3, 2, 1 seconds) + memorizing time (Memory and Order modes) + 10 seconds
| Type | Start | Minimum | Per extra answer |
|---|---|---|---|
| Find the Differences, State Difference | 7 | 4 | 3.5 |
| Color, Position, Size, Missing | 6 | 3.5 | 3 |
| Shadow, Reflection, Lightning, Turned Around, New Arrival | 8 | 5 | 3.5 |
| Object Hunt | 8 | 4 | 4 |
| Flashlight Hunt | 12 | 7 | 5 |
| Odd One Out | 7 | 4 | 4 |
| Count the Difference / Count It | 10 / 8 | 6 / 5 | 0 |
| Pick It | 7 | 4 | 2.5 |
| Remember the Order | 6 | 4 | 2 |
| Memory Match | 7 | 4 | 3 |
For example, a level 1 Find the Differences with 3 answers gives 7 + (3-1)×3.5 + 3 + 10 = 27 seconds, and a level 1 Object Hunt with 2 answers gives 8 + 4 + 3 + 10 = 25 seconds. Each level up trims one second, but only from the start value down to the minimum, and the 10-second base slack stays. Flashlight Hunt is the most generous because you have to drag a light around in the dark.
Judging taps: a touch area sized for fingers
The area that counts as a hit is more generous than the object you see.
- The answer area comes from the object’s screen rectangle and is inflated to at least 128px (measured on a 1000px-wide picture). A further 26px of margin goes around the object.
- The centers of two answers are kept at least 84px apart, so a single tap can never land on two overlapping answers.
- An answer candidate has to sit fully inside the picture’s 2% edge margin, and an object that other objects cover too much is never made an answer.
- In a puzzle where order doesn’t matter, a tap that falls between two answers goes to the one whose center is closer.
So even for a small object, you don’t have to hit its exact middle. A slight miss still counts if it lands in the answer area. Tapping all over the screen at random is the quick way to lose hearts, though.
 Remember the Order: after the numbers are shown, the prompt becomes “Tap them in the same order” and you tap the same objects in that order. The clock is stopped while you memorize.
Score, H Coins, combo, perfect
Each time you find an answer, a coin pops out and flies to the H Coin pill. Clearing a puzzle adds bonuses line by line.
| Item | Value | Condition |
|---|---|---|
| Each answer | +3 H Coins | Per answer |
| Clear | +5 + number of answers | When you clear the puzzle |
| Perfect bonus | +6 | Zero mistakes |
| Speed bonus | +4 | Cleared in under 45% of the time limit |
| Streak (in a row) | +n (max 10) | 3 or more clears in a row |
| Level-up bonus | +20 | When you level up |
Clear 3 answers fast with no mistakes and you get 9 for answers + 8 for clearing + 6 perfect + 4 speed = 27 H Coins.
- The combo is how many answers in a row you have hit in one puzzle. It resets to 0 on a mistake or when a new puzzle starts. From 3 up, COMBO x3 text appears and the answer sound climbs in pitch.
- The streak is how many puzzles in a row you have cleared. It only resets when you fail. The Streak ×n on screen is this value.
- The score is 100 + 30 × (combo – 1, up to 8) per answer, and a counting answer is worth 160. When you clear a puzzle, the time left and a level bonus are added.
H Coins pay for items, and item prices and the ad refill amount adjust on their own to match the coins you earned in recent rounds. They are only refreshed when a level starts, so prices don’t change in the middle of a round.
The five items
These are the five buttons in the bottom row. When you press one, it uses stock if you have it and pays H Coins on the spot if you don’t. No item wins the round for you; they keep you in it.
| Item | Base price | Effect |
|---|---|---|
| Magnifier | H 60 | Points an arrow at one answer (on both pictures when there are two). It disappears after 6 seconds, when you find it, or when the puzzle changes, and it never taps for you. It can’t be used on counting puzzles. |
| Time Stop | H 50 | The clock stops for 12 seconds. A light around the clock circles once, counting 12 down to 0. |
| Heart | H 80 | Refills 1 empty heart. If your hearts are full it isn’t spent; it goes into your stock as +1 instead. |
| Skip | H 90 | Skips this puzzle and moves to a new puzzle of the next game mode. No coins, streak or gauge for it. |
| Level Boost | H 100 | If you clear this round, the level gauge fills 2x (once). You can’t use it while it is already on. |
- Prices are the base values above multiplied by the coin economy factor and rounded to a multiple of 5, so at first you see the numbers above, and later they drift a little (minimum 10).
- Stock can be used only within 24 hours of buying it or receiving it as a gift. The item page also says Items are usable for 24 hours after purchase. Buying more restarts the 24 hours for existing stock too. The stock cap is 99.
- On every level-up, one of the five items is given at random as +1 stock.
- If you can’t afford one, Not enough coins appears; if it’s already on, Already working! appears.
Six rooms and 41 objects
Rooms are built from six layouts. Each room uses a palette of 8 colors (red, orange, yellow, green, blue, purple, pink and white).
- Kitchen table: a table with a tablecloth band and a tiled wall.
- Kitchen shelf: striped wallpaper, a cabinet below and two wall shelves.
- Kitchen counter: plaster wall, a counter with an upper cabinet, and a shelf on the right.
- Study desk: damask wallpaper, a desk, a chest of drawers and a wall shelf.
- Living room mirror: a room with a mirror set into the wall. It appears only in Reflection Difference puzzles.
- Living room corner: a 3D room with a window, rug, sofa, picture frame and floor lamp. Reserved for one-picture puzzles.
There are 41 kinds of object in all.
Ten of them have two or more states, which is why they are used in State Difference: cup, mug, teapot, pot, jar, toaster, clock, lamp, candle and book.
Daily reward, continue, hints
- Daily reward: a popup appears on your first visit of the day. On a fresh install, the first launch doesn’t give one and only records the date. The reward is not one of the five items but 2 hints. If you receive it through a push notification, it is 3 hints.
- Hints: the lightbulb button on the shared bottom bar. You can use 1 per round by default, plus whatever you’ve gained from the daily reward, push or ads. Using one puts a yellow ring on the next answer for 2.6 seconds, and in a counting puzzle it removes one wrong choice. It is separate from the five items above.
- Continue: when your hearts or time hit 0, the game doesn’t end straight away; a result screen comes first. There you can pick watch an ad to continue or continue with H Coins, and you resume the same puzzle exactly as it was with hearts refilled to 3 and 25 seconds added. Spots you already found stay found. The coin cost is
120 + 12×(level - 1), capped at 900. - Refill H Coins with an ad: the Watch an ad · +n H button, with a base of 200 that shifts with the economy factor.
Six tips for first-time players
- Tap just once. With two pictures, tapping the difference on A or on B once is enough. You never need to tap both.
- Read the prompt strip first. The 36 types come round in turn, so the goal is different every round. The clock only starts after the 3-2-1.
- Don’t tap in a panic. You only have 3 hearts, and only a second tap near the same spot within 0.45 seconds is forgiven.
- The clock is stopped while you memorize. In Memory Match and Remember the Order, use that time only to look. Taps do nothing.
- Ordered puzzles go in order. In Object Hunt, Flashlight Hunt, Remember the Order and Big to Small / Small to Big, tapping an answer that isn’t up next is a miss.
- Use items within 24 hours. Don’t use Heart when your hearts are full, just keep it. Save Time Stop for time-hungry types such as Flashlight Hunt.
FindMaster never serves the same board twice. A kitchen unlike yesterday’s and a mirror unlike yesterday’s are waiting.
Play FindMaster now
Playing it is much faster than reading about it.
Find the other Master Series games all in one place at hanilab.app.
More from this game
 FindMaster Touch: 128px Hit Area, 26px Padding, 84px Gap, 0.45s Repeat Tap
 FindMaster Flashlight Hunt: Drag the Light, Lift to Choose
 No Unfair Puzzles: How the FindMaster Validator Works
 FindMaster Time Limit: How the Clock Gets 27 Seconds on Level 1
🌌 Universe stories
 Roddy Universe, Part 2 — Fallen Down, Only One Step Back at the Roadside
 Roddy Universe, Part 1 — One Beat Before Crossing, the Empty Road Between the Cars
 Bombi Universe, Part 2 — Behind You: The Reaper That Walks Through Walls
Try other games
 FanMaster
 BurstMaster
 WingMaster


