
BlockMaster Scope Colors — Green, Yellow, Orange, Red: Reading the Verdict Before You Fire

The crosshair changed color.
Will this ball work on that block?
Pull the slingshot back and the small ring in the round scope at the top right turns from green to yellow, then to orange as you lower your aim a little. Same ball, same wooden block. The BlockMaster scope colors show you this change without a single word — before you fire, they tell you how this shot is going to land on that block.

This story is about the BlockMaster scope colors: what green, yellow, orange and red each mean, the three ingredients of the multiplication that picks the color, why the same ball gets a different color at a different height, and what the color does not tell you. Everything comes from the numbers in the game’s source and from real gameplay screens.
 Level 4, Drill ball — the small ring in the scope is green. This block will break
Four colors, four reactions
While you pull back to aim, the scope in the top right shows a crosshair. The small ring and cross at its center change color. The color is applied only when there is a block under the aim and the dotted line really reaches it, and it tells you what happens when the ball you have loaded hits that block. In the words of a source comment, "the rule is conveyed without a sentence" — and indeed, nowhere in the game is there a line of text explaining what the colors mean.

| Color | Reaction | What happens to the block that is hit | Threshold |
|---|---|---|---|
| Green | Breaks it | It breaks. Whatever rests on top is woken up right away | 0.72 or more |
| Yellow | Pushes it | It leaves its spot. It can no longer hold up what it was holding | 0.34 or more |
| Orange | Shakes it | It only wobbles in place and keeps doing its job as a support | 0.10 or more |
| Red | No effect | Only a mark is left and the block stays as it was | below 0.10 |
* The thresholds are about the force the block receives (in the source, a single value between 0 and 1), and the table above shows the values this story took from the source. No numbers appear on the game screen.
The order in which the colors rise is also the order of danger. From yellow up, the block stops acting as a support, which opens a way for the tower to collapse, and green adds breaking on top of that. Orange and red, on the other hand, mean that the block keeps standing and keeps holding up what is above it.
The multiplication behind the color — three ingredients
The color is not a guess; it comes from a single multiplication. The color shown before you fire and the real judgment after you fire use the same formula, so the crosshair is deliberately set up so that it cannot lie.
The number from the ball × material table. Values like Drill → Concrete 1.70 or Steel ball → Concrete 0.12. It is the very table covered in the matchup story.
A value fixed for each ball (table below). Only the free Steel ball weakens in steps as your level rises, down to 40% from level 21.
The weight resting on that block. The force is cut by how many times its own weight a single block is carrying.
The formula goes like this. Take matchup × strength (capped at 1), multiply by the load factor, and because the block is hit directly, a correction of × 1.6 + 0.06 is added. That value is then compared with the thresholds in the table above. Unfolded, the correction means the result of the multiplication gives orange, yellow and green when it exceeds 0.025 · 0.175 · 0.4125 respectively.
| Ball | Strength | Ball | Strength |
|---|---|---|---|
| Steel ball (levels 1–5) | 0.488 | Ghost | 0.777 |
| Steel ball (6–9) | 0.439 | Blade | 0.787 |
| Steel ball (10–14) | 0.351 | Bomb · Drill · Laser | 0.760 |
| Steel ball (15–20) | 0.268 | Magnet | 0.726 |
| Steel ball (21+) | 0.195 | Sonic | 0.733 |
| Multi | 0.536 | Quake | 0.743 |
| Ice | 0.709 | Wrecker | 0.879 |
* Strength = 0.42 + the ball’s destructive power × 0.34 (for the Steel ball, multiplied once more by the level-step factor). The Steel ball steps are 100% for levels 1–5 · 90% for 6–9 · 72% for 10–14 · 55% for 15–20 · 40% from 21, the very values the game reports as "Steel ball weakened · Power N%".
Load — the more it carries, the less force it keeps
The bottom row of a tall tower is pressed down by every layer above it. The source describes this as friction locking it so that it will not budge even if you hit it from the side. Call r the weight of the higher blocks overlapping within that block’s left-right width ÷ its own weight, and the force becomes 1 ÷ (1 + 0.12 × r) times as large.
| Weight carried (in multiples of its own) | 0× | 2× | 5× | 10× | 20× | 50× |
|---|---|---|---|---|---|---|
| Force left | 100% | 81% | 63% | 45% | 29% | 14% |
Put a ball’s numbers into this formula and "which ball works how far" can be worked out by hand.
Green while the weight carried is 7× its own or less, yellow up to 27×, orange up to 245×. Above that it is red.
However large the multiplication gets, it tops out at 0.195 — it never reaches the green threshold of 0.4125. Yellow only when what it carries is 0.9× its own weight or less, orange up to 56×.
Even on the material it cuts best, the value is 0.254, far short of the green threshold (the same value is written in a source comment). Yellow reaches up to 3.7×.
That is why from level 21 on the Steel ball cannot break anything and can only push soft things higher up. When it fails to break a block, No effect (the material does not accept it) or Weak! (it would have broken with its old power) can pop up on the spot once — but a block that was not broken because of its load gets neither of them, so the game says nothing, and each of the two words is shown only up to 4 times per device, and up to 3 times per Steel ball step.
Same ball, same wood — only the height differed
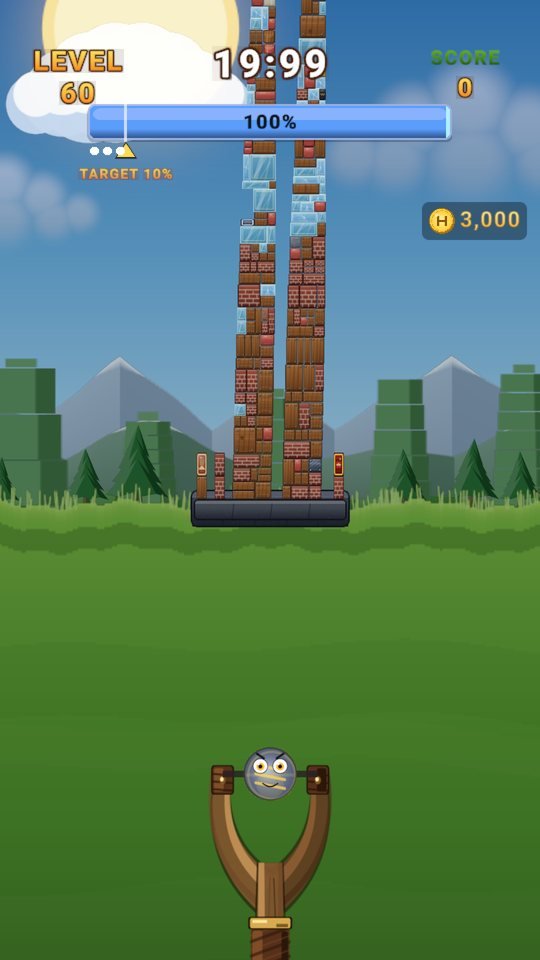
The level 60 tower is 35 floors high. It is tall enough to run off the top of the screen, so the blocks at the bottom carry every layer above them. I aimed the same Drill ball at the same wooden block at different heights, and the colors split like this (values read by calling the game’s own judgment function).
| Tower | Bottom | 1/4 up | Middle |
|---|---|---|---|
| Level 4 (8 floors) | Yellow | — | Green |
| Level 60 (35 floors) | Orange | Yellow | Orange |
* That the middle of the level 60 tower gets a lower color than the 1/4 point is the value actually read on this tower. Load counts "the weight of blocks overlapping left and right", not "height", so where the tower narrows or a side column blocks the way, the order can flip.

The comment on the Steel ball spells out this slope. It works at the top and stops working as you go down, so the design of the free ball is "shave the tower down from the top". Still, a far-away tall tower has a ceiling on how high you can shoot, so you cannot freely aim at the upper part. That story comes in the next post (distance).
What the color does not tell you
After all this, it sounds as if the rule were "red is useless, only shoot green", but it is not that simple. The color is the reaction of the one block that is hit. Whether the tower falls is judged separately — taking the height of the hit as the base, it comes down if the center of mass of the load above moves outside the foot of the remaining support (tilt above 0.82), or if it loses more than half (52%) of its support. A pushed block (yellow) and a broken block (green) are counted the same way, as "lost its support". On top of that, the same multiplication is applied to the blocks around the hit point (more weakly toward the edge), so even if the dead center is red, things change when the paper next to it gets pushed.

In this run the remaining-percentage bar plunged 100% → 89% → 66% → 49% as the clip plays. It is proof that red does not simply mean "nothing happens". That does not make the color meaningless either. Gathering twenty-eight shots fired under the same conditions (Steel ball · Drill · Wrecker, levels 31 · 43 · 60, one shot at a time) by color gave this.
| Color before the shot | Shots | Median share collapsed | Lowest ~ highest |
|---|---|---|---|
| Red | 8 | 69% | 0% ~ 91% |
| Orange | 15 | 81% | 43% ~ 91% |
| Yellow | 5 | 84% | 57% ~ 87% |
* These are values measured one shot at a time for this story, so the sample is small, and even the same spot gives different results because of the physics (one red shot at level 43 gave 0% once and 58% another time). Green never came up in this sample (shots aimed from the bottom to the middle).
The median rose a little as the color went up, but the ranges overlap widely. So the scope color is accurate information about "what happens to this one block", not a forecast of "the result of this shot". Before you fire, pick your ball by the color; after you fire, check with the remaining-percentage bar.
Scope colors in five lines
- Green · yellow · orange · red = breaks · pushes · shakes · no effect. It is the reaction of the one block that is hit.
- Color = matchup × ball strength × load. Change the ball and the matchup and strength change; change the height and the load changes.
- The lower you aim and the taller the tower, the color drops a step. The same ball on the same material does it too.
- From level 21 the Steel ball has no green. Yellow means a spot you can push; red means it is time to change the ball.
- The tower can fall even on red. It can also hold on yellow or above. The color is information; read the result on the remaining-percentage bar.
The next story is about distance, the ground under all of this. When a tower that starts 10 m away drifts out to 52 m, how small do the blocks get, and how far can you reach?
Read the color before you fire,
read the bar after.

Play BlockMaster now
Playing it is much faster than reading about it.
Find the other Master Series games all in one place at hanilab.app.
More from this game
 BlockMaster Ball Shop Script: The Steel Ball Is Free, the Laser Takes Three Rounds
 BlockMaster Distance — From 10 m to 52 m, How to Shoot a Tower That Keeps Moving Away
 BlockMaster Weak Point — Aim Low, Not High: The Physics of a Collapsing Tower
 BlockMaster Stars — Not “Can I Clear It?” but “In How Many Shots?”
🌌 Universe stories
 Roddy Universe, Part 2 — Fallen Down, Only One Step Back at the Roadside
 Roddy Universe, Part 1 — One Beat Before Crossing, the Empty Road Between the Cars
 Bombi Universe, Part 2 — Behind You: The Reaper That Walks Through Walls
Try other games
 FindMaster
 LottoMaster
 TakMaster