


The first tower is 10 m away,
the last one 52 m
While the 3, 2, 1 counts down, a yellow arrow is drawn from the slingshot to the tower, with a distance written beside it. Level 1 is 10 m. As the levels climb, that number grows to 22 m, 31 m, 42 m and creeps toward 52 m. Same slingshot, same ball, and only the tower moves away, yet that is how BlockMaster distance changes your aim.

This story is about BlockMaster distance: what a tower that drifts from 10 m out to 52 m changes on screen and in your aim. Blocks shrink, the launch angle drops, and there is a “ceiling” on the height you can actually hit, which I measured myself. Everything comes from real gameplay screens and numbers in the source.
One line of distance: from 10 m to 52 m
The distance on screen comes from a single perspective value (0 to 1) set by the level. It is 0 at level 1 and halves the remaining gap as levels rise, closing in on 1: perspective = 1 − 0.5(level−1) ÷ 14. Every 14 levels the remaining share is cut in half, so early on each level is clearly farther away, later the change is very slow, but it never stops. The distance shown on screen is 10 m + 42 m × perspective (rounded).
| Level | Perspective | Distance on screen | Block size | Floors on the scale curve |
|---|---|---|---|---|
| 1 | 0.00 | 10 m | 100% | 6 floors |
| 8 | 0.29 | 22 m | 81% | 10 floors |
| 15 | 0.50 | 31 m | 67% | 14 floors |
| 29 | 0.75 | 42 m | 50% | 20 floors |
| 43 | 0.88 | 47 m | 42% | 27 floors |
| 71 | 0.97 | 51 m | 36% | 41 floors |
| 100 | 0.99 | 52 m | 34% | 55 floors |
* Distance and block size are calculated from the formulas in the source, and the floor count is the level’s size target, so a real tower can differ a little depending on its architecture style.
The arrow and its distance label are only visible while the 3, 2, 1 counts down, and it is pulled away the moment the “1” disappears. In a head-on view it is hard to tell whether the tower got smaller or moved away, so, as the source comment puts it, a single line of numbers is the shortest proof that “the level went up”.
Farther away means smaller blocks and a bigger scope
Perspective changes three things at once. The blocks shrink (100% down to 34%), the tower rises slightly toward the horizon, and a sky-coloured haze mixes in. The haze is capped at 38% toward sky blue, because wiping out the material colours would make the matchups unreadable. The source comment says the blocks are shrunk this much (0.34x) on purpose: so that a rough “about there” by eye stops working and you actually look into the magnified scope in the top right.
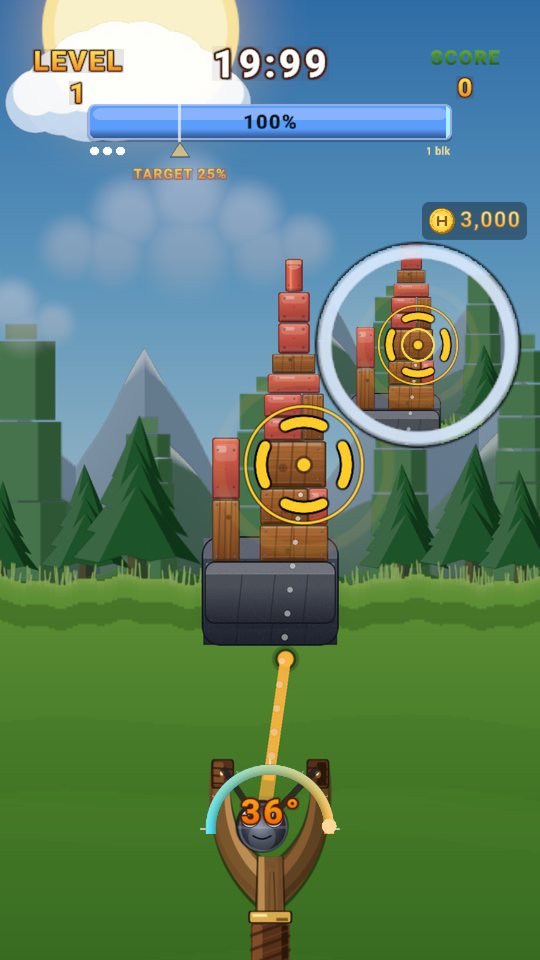


The scope’s magnification also rises with distance. It starts at 3.2x and, at the farthest point, is multiplied by another 2.1 for about 6.7x. In the three photos above the scope keeps showing the aimed spot at a readable size, while on the main screen the tower gets thinner and thinner. That is why aiming at a distant tower really happens inside the scope.
The arc lies down: launch angle from 36° to 17°
The farther you throw, the higher the ball climbs and the more its path leaves the screen. So the game lowers the launch angle you can use along with the distance. According to the measurements in the source comment, at 52 m even the lowest angle sent the path out past the top of the screen, and at 10 m a 50° shot made the dotted line rise over the tower and drop back down, so the curve looked “upside down”. The current ranges are these.
| Level | Distance | Usable launch angle | Tower depth (internal units) |
|---|---|---|---|
| 1 | 10 m | 20° ~ 36° | 9.5 |
| 15 | 31 m | 14.5° ~ 26.5° | 21.8 |
| 29 | 42 m | 11.8° ~ 21.8° | 27.9 |
| 60 | 50 m | 9.6° ~ 18.0° | 32.7 |
| 100 | 52 m | 9.1° ~ 17.1° | 33.8 |

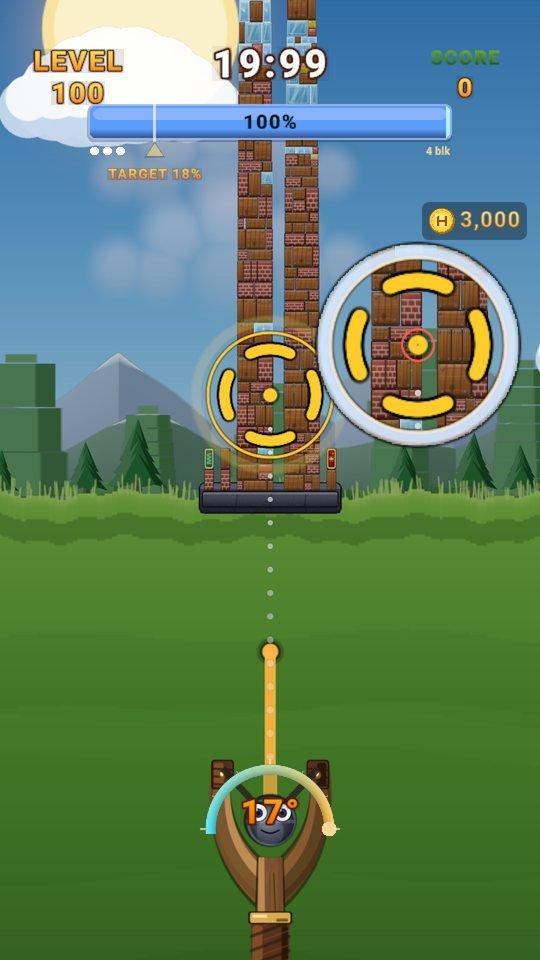
The half-circle gauge above the slingshot shows the launch angle in degrees you are aiming at. Pull your finger straight up and you get that level’s maximum angle: 36° at level 1, 17° at level 100. The same gesture becomes a lower, flatter path. The power gauge keeps the same shape regardless. It maps the pull onto 86% to 124% of the speed that would land exactly on the tower at that angle, so a short pull falls in front and a pull that is too strong flies past the tower.
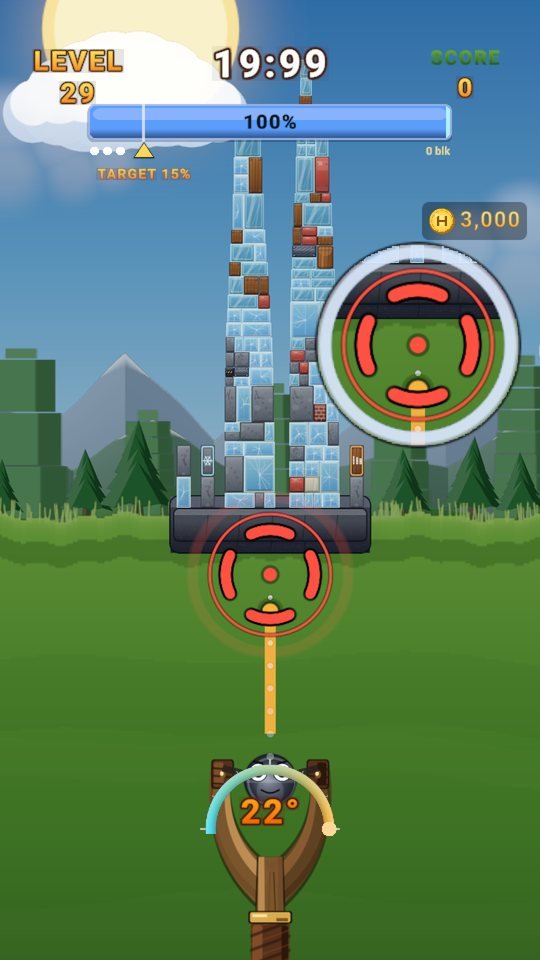
If the power is short, the dotted line drops before it reaches the tower, and the landing mark and the aim line inside the scope turn red. The photo on the left is level 29 with only 14% pulled on purpose. Gold when it hits, red when it falls short: the source comment says the point of this mark is to tell you “why it missed” before you shoot.
The source also explains why you can trust the dotted line. The dotted line, the ball in flight, and the checker that solves the tower in advance all integrate the path with the same function, so they cannot disagree. The one catch is that the dotted line does not know about wind and the ball does, the same story as in the wind story.
A ceiling on reachable height: I measured it
A lower maximum angle brings one consequence: the ball can only reach up to a certain height. Towers grow up to 100 floors, but the height the ball reaches stops at some line or even drops, so the upper part of a distant tower has a zone you cannot aim at. The game does not show this number, so for this story I measured it with the Steel ball. I aimed from the bottom (0%) to the top (100%) of the front-row block in 10% steps and checked whether any aim brought the dotted line within 0.35 of a block of that spot.
| Level | Distance | Floors on the scale | Highest reachable spot (of tower height) |
|---|---|---|---|
| 1 | 10 m | 6 floors | 70% |
| 8 | 22 m | 10 floors | 100% (all the way up) |
| 15 | 31 m | 14 floors | 80% |
| 29 | 42 m | 20 floors | 70% |
| 43 | 47 m | 27 floors | 60% |
| 60 | 50 m | 35 floors | 50% |
| 80 | 51 m | 45 floors | 60% |
| 100 | 52 m | 55 floors | 30% |
* Measured with the Steel ball (the Wrecker and the Laser gave the same result at the same levels), in 10% steps, so there is a margin of ±10%. It is one tower measured once, so it may differ a little from level to level. I guess level 1 is lower than level 8 because the shallow depth also limits how high the same power range (up to 124%) can lift the ball, but I did not confirm that in the source. It is a guess from the measurements.


Aim at a height you cannot reach and the scope goes blank white, with no coloured ring. It means there is no path for the ball to that height. The checker that solves the tower in advance to find the weak point also uses that level’s real maximum angle as is (the source comment explains that an answer counted with an angle you cannot use is not an answer), so weak points are built to come out where you can reach them.
So how do you bring down a distant tower? Hit the bottom and the top follows. Below is a level I aimed by hand.

This one is a level 1 tower. For a distant tower the idea is the same, but you aim at the lower part, a spot you can actually reach. Hitting what you can reach brings down what you cannot, and that is how a distant tower is designed. Still, the same conditions do not always give the same result (as in the target colour story, the physics differs from level to level).
Five lines for reading a distant tower
- Distance = 10 m + 42 m × perspective. The remaining share halves every 14 levels, so it creeps toward 52 m without end.
- Blocks go from 100% to 34%. The farther away, the more the scope (×3.2 → ×6.7) is the main screen rather than your naked eye.
- The launch angle goes from 36° to 17°. The same gesture becomes a lower, flatter path. Aim with the angle gauge.
- There is a ceiling on reachable height. If the scope goes blank white, you cannot reach that height. Hit the bottom to bring down the top.
- Red means short on power. Adjust your pull until the landing mark turns gold.
The tower moves away and the height you can reach gets lower. Even so, there is always somewhere to shoot. Which height will you go for today?
The farther it is, the more you trust the scope.
Shoot low and bring the top down.

Play BlockMaster now
Playing it is much faster than reading about it.
Find the other Master Series games all in one place at hanilab.app.
More from this game
 BlockMaster Ball Shop Script: The Steel Ball Is Free, the Laser Takes Three Rounds
 BlockMaster Scope Colors — Green, Yellow, Orange, Red: Reading the Verdict Before You Fire
 BlockMaster Weak Point — Aim Low, Not High: The Physics of a Collapsing Tower
 BlockMaster Stars — Not “Can I Clear It?” but “In How Many Shots?”
🌌 Universe stories
 Roddy Universe, Part 2 — Fallen Down, Only One Step Back at the Roadside
 Roddy Universe, Part 1 — One Beat Before Crossing, the Empty Road Between the Cars
 Bombi Universe, Part 2 — Behind You: The Reaper That Walks Through Walls
Try other games
 FindMaster
 LottoMaster
 TakMaster


